• +27 12 644 0300
  • +44 1234 834920
  • This email address is being protected from spambots. You need JavaScript enabled to view it.


Caddie Licence Activation

Easy Guide to activating your Caddie software licence.

Congratulations on the purchase of your Caddie software licence.

You should by now have received an activation email providing you with a link to the licence activation page, and the Product Key(s) for your Caddie licence(s).

If you have not received your email yet, then please check the Inbox for the email address you provided at the time of purchase, 'Clutter', 'Junk email' and/or Spam folders first, then contact This email address is being protected from spambots. You need JavaScript enabled to view it. for assistance if the email cannot be found.

Once you have located your Caddie licence activation email follow this three step guide to activate your Caddie licence.

1.Download the Caddie software

Before activating your free licence, you will first need to download and install the Caddie software program (otherwise you have nothing to activate).

Now that you have activated your licence(s), download the Caddie install file via the link below, saving the file to your ‘Downloads’ folder or other suitable file location:

   Download Caddie

2. Install the Caddie program

Once the download is complete, ‘Run’ the downloaded file to start the installation.

Follow the on-screen prompts, accepting the terms and conditions, and clicking the ‘Next’ buttons when prompted to continue.

Once the installation is complete, click the, ‘Finish’ button to close the install dialogue.

The Caddie software program is now installed on your computer.

3. Activate your Free Caddie licence

Follow the link to the licence activation page, https://licensing.caddiesoftware.net:446/ems/customerLogin.html

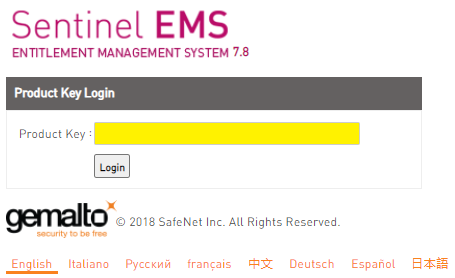
 Enter the Product Key included with the activation email into the Product Key field on the login dialogue (here shown yellow)

Then click ‘Login’ 

On the page that loads, click the, ‘Online Activation’ button to activate your Caddie licence.


For more information on activating your Caddie licence, watch the Caddie Licence Activation Video included below...


Further Links and Information

What's New Videos

The feature focus videos are a brilliant way to discover what's new in Caddie 26, displaying the functionality, many showing the new tools and features in real-world type scenarios, watch the videos HERE

Discover the new Caddie GIS Application
Along with a myriad of time saving new features, we are  please to announce a completely new Caddie Application available as an option with the Professional version.

The Caddie GIS App provides easy access to Geographic Information System (GIS) data covering, mapping, infrastructure buildings and roads, as well as details of local services, amenities, flooding, population and more.

Access data directly from sources including,

• Bing and Google Mapping

• OpenStreetMap

• Ordnance Survey

• And UK Government Data

Providing the unique ability to port GIS data directly into everyday Caddie .dwg drawings, the Caddie GIS is for those wishing to create informed and substantive designs without the need to invest in expensive alternative software and time-consuming data reformatting.


International Sales UK +44 (0) 1234 834920 email: This email address is being protected from spambots. You need JavaScript enabled to view it..uk
South Africa Sales SA +27 (0) 12 644 0300 email: This email address is being protected from spambots. You need JavaScript enabled to view it.
Online Training
 
Learn More...
Caddie Educational *FREE for Students and Educators
 
*Caddie Educational is FREE for Students and Educators at qualifying institutions (non-commercial use)
All trademarks acknowledged


Applies To

Caddie Professional & Budget

Question

Caddie Professional & Budget stop saving after double clicking a drawing file in Windows Explorer to open it, on some machines.

The following fix rectifies the problem but it can occur again if you double click a file in explorer again. A permanent software fix will be made available, or alternatively the temp folder can be relocated by changing the registry, which also provides a permanent solution.


Description of Errors

Solution


To resolve the error when Caddie does not want to save a file nor do a backup when in Professional or Budget mode:


1.       Open up the Registry Editor in Windows

1.1   Click on Start

1.2   Type in Regedit in the search box

1.3   Click on Regedit.exe

2.       Open the directory tree as follow:

2.1   HKEY_CURRENT_USER > Software > Advanced Computer Solutions > (Your Caddie version) > Caddie > SysVars > Env > App > NamedDirs

2.2   Check to see where the TempDir should be (in this case C:\ProgramData\Advanced Computer Solutions\Caddie20 (x64)\temp\)

3.       Check and recreate the missing folder

3.1   Open Explorer

3.2   Browse to the folder as described in your Registry

3.3   If the temp folder does not exist you need to create a folder called temp

4.       This will allow you to save and backup your drawing again.


Applies to

Caddie 18 and later. Note that no previous versions will work on Windows 8

Question

When installing Caddie on a computer with a Windows 8 operating system, Caddie fails to find the dongle. What do I need to do?

Solution

Currently the installation of the dongle driver (HASP driver) on a computer with a Windows 8 operating system requires a different driver from the default one installed. This driver will have to be installed after Caddie has been installed.


If Caddie 18 was installed from a DVD there will be a file with the following name in the specified path

               .\Drivers\Aladdin\HDD32\Caddie_Hasp_6_51.exe


If you do not have a disk for Caddie 18 the Windows 8 dongle (HASP) driver can be downloaded from the downloads section of the website


Note: you will have to login for permissions to download this file.


After Caddie is installed run the dongle (HASP) driver that you have (disk or download as mentioned). This will install the correct driver for Windows 8.

To Install

  • Download the file to the local computer (make a note where it is saved).
  • Right Click on the downloaded file and select 'Send To', Select 'Desktop (create shortcut)' from the list that appears.
    This will create a shortcut on the desktop.
  • Locate the shortcut and right click it then select Properties.
  • In the 'Target' box add  -r to the end of the line (Note this is a space followed by -r).
    The target will now look something like:

C:\Downloads\Caddie_Hasp_6_51.exe -r -purge (assuming the file was downloaded to 'c:\Downloads')

  • Select OK to close the dialogue.
  • Double click the shortcut - A small progress box should be displayed and after a few minutes it should read 'Operation Completed Successfully'.
  • Click OK to close the progress box.

If User Account Control is set to a high level, you may have to confirm your permission for the program to run.

  • Locate the shortcut again and right click and select Properties.
  • In the 'Target' box, change the last character from r to i.
    The target will now look something like:

C:\Downloads\Caddie_Hasp_6_51.exe -i (assuming the file was downloaded to 'c:\Downloads')

  • Select OK to close the dialogue.
  • Double click the shortcut - A small progress box should be displayed and after a few minutes it should read 'Operation Completed Successfully'.
  • Click OK to close the progress box.

If User Account Control is set to a high level, you may have to confirm your permission for the program to run.

The above assumes that the latest driver downloaded was Caddie_Hasp_6_51.exe. Change the name in the above commands as appropriate for the version downloaded

The hasp driver is now installed

Note: You must have administrator permissions to perform the above task.

If for any reason any of the above tasks fail, then you should change the User Account Control (UAC) settings.

To do this type UAC in the Start menu search bar and choose "Change User Account Control". Change the slider to the lowest level.

Also set the Privilege level by right clicking the shortcut and from the Compatibility tab tick the  'Run as Administrator' tick box, and retry.


To check that the driver is correctly loaded open a web browser page and go to: //localhost:1947

If the driver is correctly loaded that should take you to the Sentinel Admin Control Center Page where you can see the status of your dongles and softlock licenses. If you are unable to display the page, check that the driver was installed correctly and also check that you have no firewalls etc. blocking access.


Applies To

Caddie 16

 
Question

 Where are the default locations for the various user settings, such as plotstyles, templates and fonts etc.

Answer

Prior to Caddie 16 the default common and user, folders and files, such as Plotstyles, Styles, Hatches, Templates etc., where contained within the Caddie installation folder. Over the years the security of the Windows® operating system has been tightened and access to folders within the 'Program Files' folder needs special privileges.

To comply with Microsoft® standards, from Caddie 16 these "User" folders and files have been moved to a more accessible folder within the Windows® environment. Depending with variety of operation system you have will depend where the folders are and what they are called. In order to make accessing these folders easy, Caddie has added a section 'MENU | UTILITIES | BROWSE'. Here you will find two links:

Common Application Files & Folders

These are the ones that every user can access and includeds some or all of the following

Folders

Backup

Block Libraries

Config Data

Fonts Hatch

Linestyles

Plotstyles Styles

Files (Caddie Defaults)

Arch-SA.ldf (Arch-SA Layer Definition)

Caddie.ks (Keyboard Shortcut)

Caddie.ldf (Caddie Layer Defination)

USCommon.dic (Dictionary)

USMain.dic (Dictionary)

USUser.dic (Dictionary)

User Folders & Files

These are the Files &  folders specific to the current logged in user and includeds the following:

Folders
Backup
Layouts16
Logs
Temp
Files (User Specific)
customcommandnames.txt (
userCaddie.ksu (Dictionary)
userCustomizationData.dat (Screen Layout Data
Various Temporary Files
tempnnnnn.nnn
 
These changes will also make it lot easier when installing future versions of the software, as none of the folders need to be changed.
 

Note

You can specify the actual folder used using 'SETTINGS | ENVIRONMENTAL SETTINGS | FOLDERS'. This is also a good place to check the folder paths you may have previously set up. 


Applies to

Caddie 17 build 2 and later

Question

How can I import a screen layout from a previous version of Caddie?.


Solution


Caddie 17 build 2 has a new direct import of screen layouts from Caddie 16. After installing Caddie 17 you will be asked if you want to migrate your settings from a previous version. If you select 'Yes', one of the options will be to import your screen layout.


If you have already been past this step and resplied 'No', you can get back to this option at any time by going to Utilities -> System -> Migrate Settings from Caddie 16.


Note that this option is only valid for importing settings from the previous major release of Caddie.


© 2025 Caddie Limited. All Rights Reserved.