- +27 12 644 0300
- +44 1234 834920
- This email address is being protected from spambots. You need JavaScript enabled to view it.
Articles
How can I produce a schedule of room sizes in my drawing?


- Details
- Parent Category: FAQs
- Category: General
- Created on Wednesday, 27 April 2011 15:22
- Hits: 10460
Question
In my drawing I have a number of rooms that I am required to provide area measurements of. I may also require to provide volume measurements. How can this be done in Caddie?
Answer:
There are a number of tools within Caddie that can make area measurements.
From Caddie 15 a new set of tools were added which makes area and volume measurement not only easy to use but also allows dynamic changes based on the drawing its self. I addition the information is presented in tabular form.
This set of tools can be accessed from one of the regional 2D architectural applications.
Those who use the SA Arch tools can find the measurement tools in the 'Sched' section.
Those using the ArchUK application can also find a 'Sched' section.
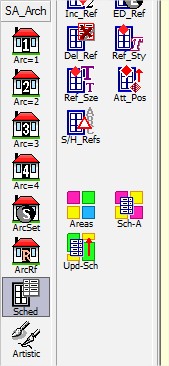 D1
D1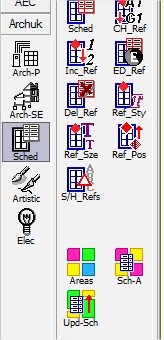
Which ever one you choose the process and results are the same.
You are first asked to draw around the area using a polyline. All the normal polyline modifications are allowed, such as curves and the close command.
TIP
If the area is a rectangle just indicate the two diagonal points followed by an 'Option End' and Caddie will do the rest. Remember this tip, as it can used in many other places where the only option is to draw with a polygon or polyline, and you want a rectangle.
When you do an Option End after each indicated area, the following dialogue will open
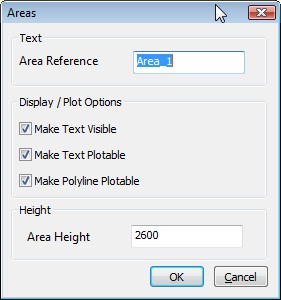
The 'Area Reference' is the room name etc. When the area is selected with the previous step a polyline is drawn.
The area reference text is placed in the drawing. This can be visible and / or plotable by ticking the relevant tick box.
The style the text uses is the current style as set in 'CADDIE | TEXT | TEXTSET' .
As this is standard text it can be edited and repositioned just like any other text.
If the "Make Polyline Plotable" tick box is ticked the polyline will plot.
If you require a volume also specify the height.
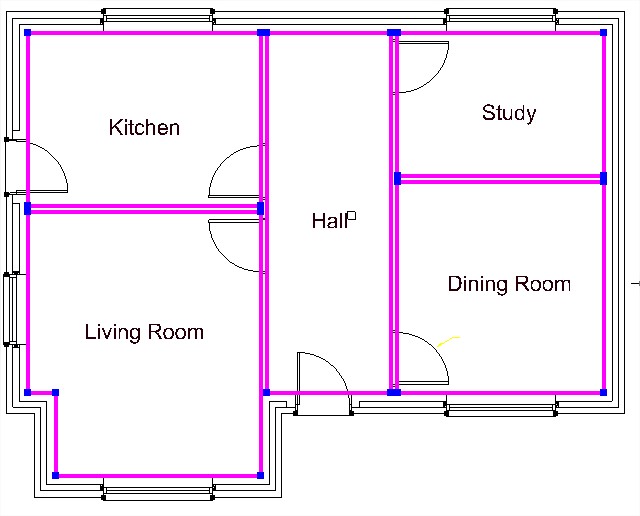
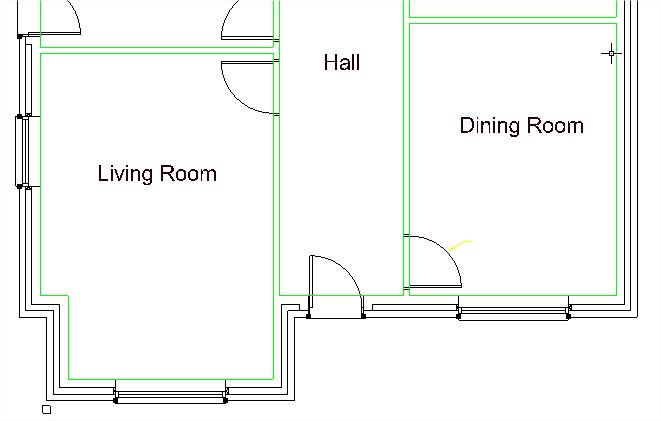
below is a typical selection 9the polylines are shown selected for clarity).
The room name were those specified in the dialogue above.
Once all the areas have been added, select the SCH-A tool and the following dialogue will appear.
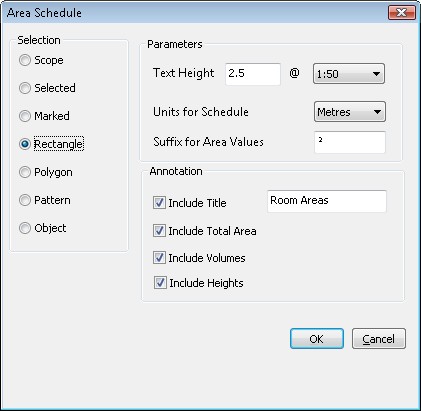
Choose the selection area.
Set the Text height and scale value.
The Units are the units of the table areas and volumes.
Add a suffix to the value if required. Leave blank for none. Note a number of fonts may give none or different characters than the one selected. Choose a font in the TEXTSET dialogue, which contains the character you want to use. If necessary use the Windows "Character Map" tool form Windows Start | All Programs | Accessories | System Tools.
The tick boxes allow the selection of the column titles. If "Include Title" is ticked, give the table a name.
When completed select OK and indicate where the table is to be placed.
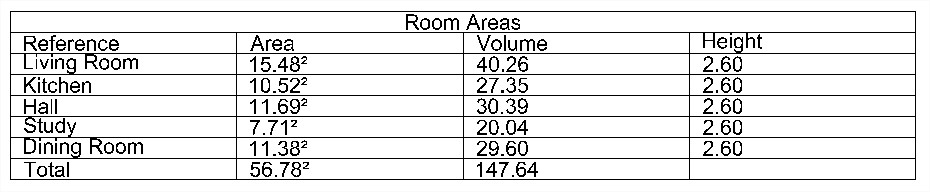
The result will look something like this.
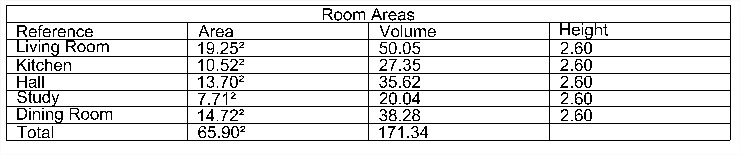
If some changes are made to the area, such as a stretch by 1000mm in this example, all that needs to be done is to use the UPD-Sch command
Indicate which table you want to update, and the changed values will automatically be updated.
{JFBCLike}