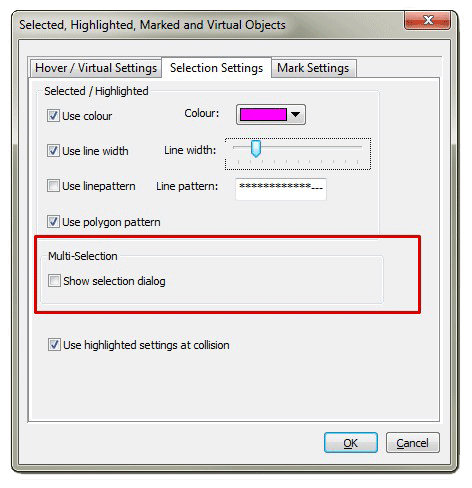
To manipulate objects in various ways you first have to indicate the object(s). This can be done in two ways. You can either "Mark" the object(s) or you can "Select" the object(s). There are some fundamental differences between Marking and Selecting.
This first is they way the commands are accessed. Marking is done from the MARK commands whereas Selection is done either directly on-screen or using the right click Context Menu.
Secondly objects also stay Marked until an Un-Mark is done whereas Selections will be removed on an Option-End, a Redraw, a ReGen or starting a new command also there are other processes that will also remove selection. So basically selection can be treated as a temporary whereas marking is long term. For more details on Marking refer to the MARK commands.
If you left click with the cursor near an object the object will be selected. Left clicking any selected object will also un-select it.
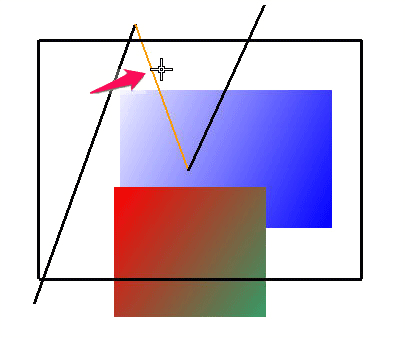
If you are a distance from an object then the selection process works with a rectangular selection area. First click in a position away from an object and then select a diagonally opposite corner of a rectangular shape.
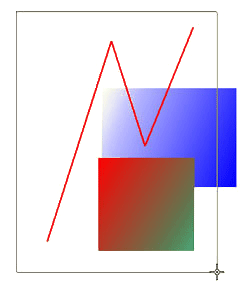
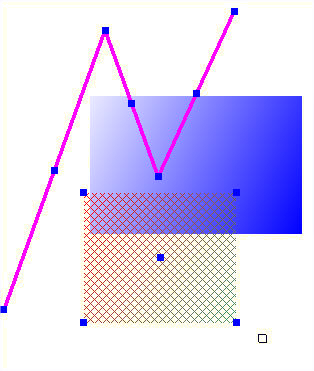
If this selection rectangle is draw left to right (solid lines) then all "Complete" objects will be selected.
If the selection rectangle is drawn right to left (dashed lines) then all object the that are included or passed through will be selected. In this way you can select whole areas and then individually select object to either add to or remove from the selection.
Try drawing a selection rectangle a few pixels high from right to left to select vertical construction lines. which can then be manipulate (Transformed) with the context menu, or even deleted using the delete key on the keyboard.
If you right click after the selection you will bring up the context menu. Here you can do many operations including deleting, moving, mirroring etc. The actual available operations will depend on what has been selected. See the Context Menu for more details.
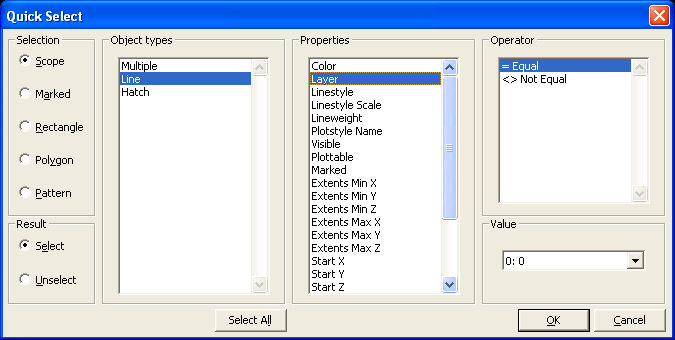
You can also make precise selections by the properties of object by using the context menu "Quick Select" command. This brings up the following dialogue box. The left side presents the selection result choices. Use it to choose the area of the drawing to be selected with the other settings. The results section allows you to either use the selection or negate the selection. In the object type section you will be presented with all the current objects in the drawing plus multiple for all of them. Here you can select one or more object types using a combination of control and shift keys with the left mouse button (or pen equivalent). Depending on what is selected in the "Object Types" selection window will depend on what properties are shown in the "Properties" window also this window will show a limited set of properties if more than one object type is selected.
The operator section allows a choice of "Equal" (=), "Not Equal" (<>), "Greater Than" (>) and "Less Than" (<).
When you have made your selection you can click OK and the select will
be made. Once the "OK" button has been clicked, the selection
will be made and the dialogue will open again, allowing additional selections
to be made. If no further selections are required, "cancel"
the dialogue.
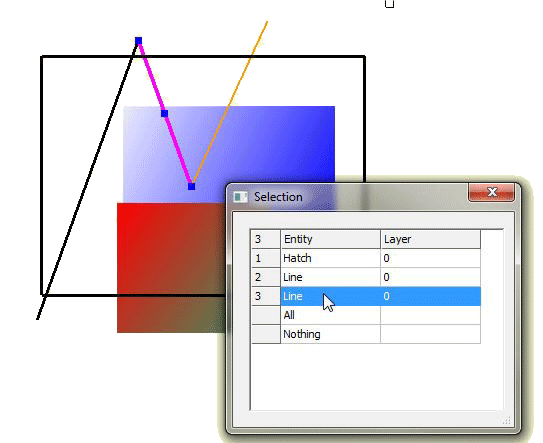
Using the selection shown in the screen capture above you can see that a single line is selected. This line is the only line on layer "0".

See Also