
Move Cursor - Move the cursor to a position in the drawing area before entering the next point.
There are many reason why a cursor or indeed the next point for say lines or hatch etc. needs to be specified with relation to a current or specified co-ordinate position.
When looking at the Snap Modes help you will notice there is one intermediate snap called move cursor.
|
|
Move Cursor - Move the cursor to a position in the drawing area before entering the next point. |
Move cursor is not really a snap. The sole purpose of using this is to move the cursor to a known position where the next measurements can be made from.
Let's say that an X&Y pair of construction lines needs to be placed at a distance of 300 in both the X & Y directions from a corner of a building.

When the XY construction line command is selected, Caddie will for the position. This can be indicated of specified as an x & y co-ordinate in the command line. However in this case we first need to position the current cursor by first indicating the corner of the wall (A). To do this we select a snap for the corner, such as AUTOSNAP or ENDPOINT and follow this with the snap mode MOVE CURSOR. When we indicate the corner, all that happens is the current cursor positions moves to it. Now when we specify the distance using X&Y co-ordinates followed by a keyboard ENTER or RETURN, the distance is based on the current cursor position (A) which in this case is building corner. The effect is that we now have a pair or construction lines at the require 300x 300 position from the corner.
.png)
It is important to note, that both the X and the Y co-ordinates need to be specified, even if the Y value is "0" it must be specified. To keep things simple we have ignored the Z value as, if this is "0" it need not be specified. To see why the Y value needs to be specified see below.
The example above can also be achieved in a simpler way by just hovering over the required origin point an pressing Equals "=" on the keyboard. This method dispenses with the need to select the MOVE CURSOR snap mode

If only single value is specified then that distance will be used in the direction of the current mouse position
 |
B indicates with a value of 15000 |
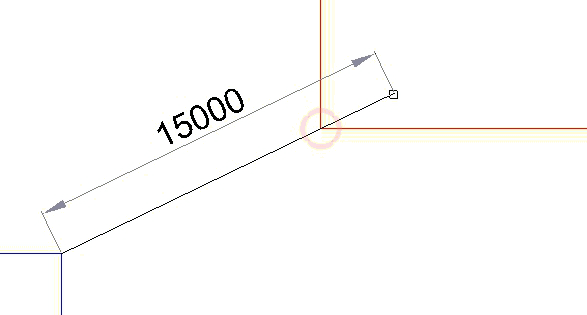 |
The Result |
In the example above a line of length 15000 is being drawn from A to C but must pass through B. Start the line by snapping to A. Hover the mouse over B and type the required value, in this case 15000. Caddie will now draw a line, projecting to or through B and be of a length of 15000. If the snap was freehand then the projected position would be the mouse pointer position.
This same technique can also be used when inserting or moving objects.
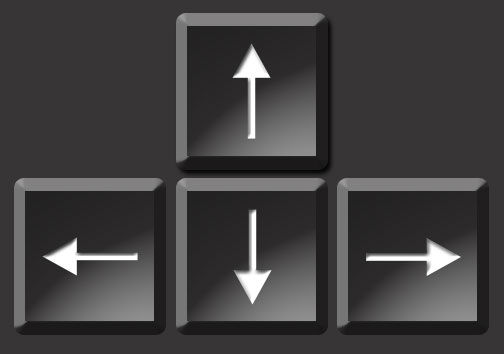
Most desktop computer keyboards have a set of navigation keys. These keys can be used to great effect in Caddie when anything needs to be drawn or moved orthogonally. This could be when drawing a line. After indicating where the start point is to be, the end point could be drawn 5000 to the right by typing the value(5000) and pressing the right arrow navigation key. Moving would be in exactly the same way.
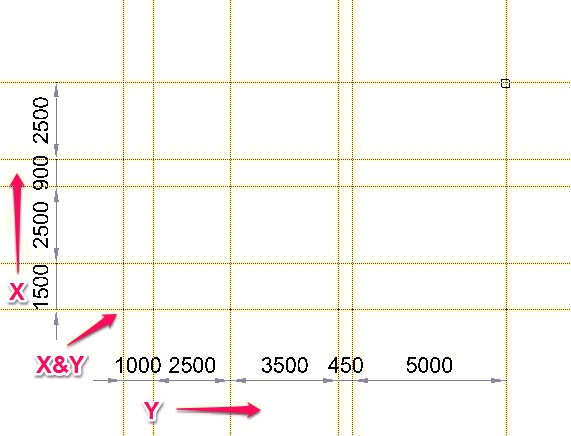
A good example of using the navigation keys is when laying out construction lines.
Place an X & Y construction line somewhere in the drawing. Select a Y construction line. with out moving the current cursor origin and not using the mouse, type the following values each followed by a right navigation key. What you will find is that there are a series of Y construction lines with the spacings as specified.
Change the Command to an X construction line and once again specify the values, but this time use the UP navigation key.
What you should end up with is something like this.
And don't forget this is also useful for moving selected objects. A window is a wall needs moving 500mm to the left. Select the AEC window centre grip point and type in 500 and press the LEFT navigation key. The window moves 500 to the left. This assumes the wall is in the X axis.
Also See