- +27 12 644 0300
- +44 1234 834920
- This email address is being protected from spambots. You need JavaScript enabled to view it.
Installation & Troubleshooting
Answers to common installation queries
Caddie 22 will not start - missing dll


- Category: Installation & Troubleshooting
- Wednesday, 15 December 2010 14:47
APPLIES TO
- Caddie 22 or later
QUESTION
Having installed Caddie 22, on first start an error message is shown:
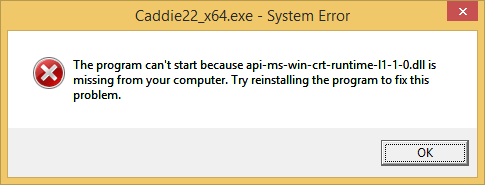
ANSWER
The Microsoft Visual Studio 2015 C++ redistributables failed to install correctly. This can happen for a number of reasons depending on the operating system:
Windows 7: Windows 7 Service Pack 1 is required before the redistributables can be correctly installed.
Windows 8.1: Windows 8.1 Update KB2919355 must be installed before the redistributables can be correctly installed.
Once the above files have been installed the redistributables should be uninstalled and reinstalled. Doing a repair rather than an uninstall and reinstall is unlikely to fix the issue.
OTHER FAQ's
None
Caddie Backup and Save Stop Working
- Category: Installation & Troubleshooting
- Thursday, 11 June 2015 12:35
Applies To
Caddie Professional & Budget
Question
Caddie Professional & Budget stop saving after double clicking a drawing file in Windows Explorer to open it, on some machines.
The following fix rectifies the problem but it can occur again if you double click a file in explorer again. A permanent software fix will be made available, or alternatively the temp folder can be relocated by changing the registry, which also provides a permanent solution.
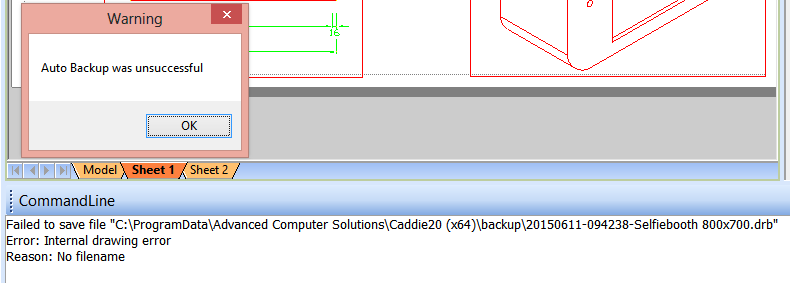
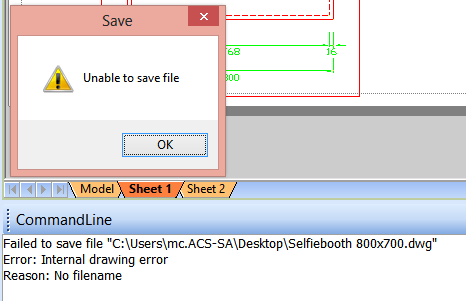
Description of Errors
Solution
To resolve the error when Caddie does not want to save a file nor do a backup when in Professional or Budget mode:
1. Open up the Registry Editor in Windows
1.1 Click on Start
1.2 Type in Regedit in the search box
1.3 Click on Regedit.exe
2. Open the directory tree as follow:
2.1 HKEY_CURRENT_USER > Software > Advanced Computer Solutions > (Your Caddie version) > Caddie > SysVars > Env > App > NamedDirs
2.2 Check to see where the TempDir should be (in this case C:\ProgramData\Advanced Computer Solutions\Caddie20 (x64)\temp\)
3. Check and recreate the missing folder
3.1 Open Explorer
3.2 Browse to the folder as described in your Registry
3.3 If the temp folder does not exist you need to create a folder called temp
4. This will allow you to save and backup your drawing again.
Licence Activation Help
- Category: Installation & Troubleshooting
- Friday, 22 January 2021 16:25
Caddie Licence Activation |
||
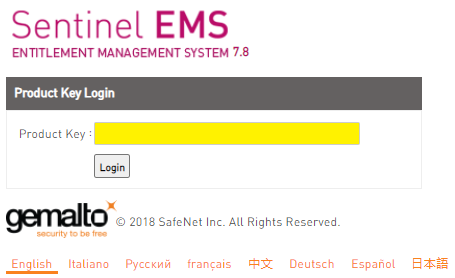
Easy Guide to activating your Caddie software licence.Congratulations on the purchase of your Caddie software licence. You should by now have received an activation email providing you with a link to the licence activation page, and the Product Key(s) for your Caddie licence(s). If you have not received your email yet, then please check the Inbox for the email address you provided at the time of purchase, 'Clutter', 'Junk email' and/or Spam folders first, then contact This email address is being protected from spambots. You need JavaScript enabled to view it. for assistance if the email cannot be found. Once you have located your Caddie licence activation email follow this three step guide to activate your Caddie licence. 1.Download the Caddie software Before activating your free licence, you will first need to download and install the Caddie software program (otherwise you have nothing to activate). Now that you have activated your licence(s), download the Caddie install file via the link below, saving the file to your ‘Downloads’ folder or other suitable file location: 2. Install the Caddie program Once the download is complete, ‘Run’ the downloaded file to start the installation. Follow the on-screen prompts, accepting the terms and conditions, and clicking the ‘Next’ buttons when prompted to continue. Once the installation is complete, click the, ‘Finish’ button to close the install dialogue. The Caddie software program is now installed on your computer. 3. Activate your Free Caddie licence Follow the link to the licence activation page, https://licensing.caddiesoftware.net:446/ems/customerLogin.html
Enter the Product Key included with the activation email into the Product Key field on the login dialogue (here shown yellow) Then click ‘Login’ On the page that loads, click the, ‘Online Activation’ button to activate your Caddie licence.
For more information on activating your Caddie licence, watch the Caddie Licence Activation Video included below...
Further Links and Information What's New VideosThe feature focus videos are a brilliant way to discover what's new in Caddie 26, displaying the functionality, many showing the new tools and features in real-world type scenarios, watch the videos HERE Discover the new Caddie GIS Application The Caddie GIS App provides easy access to Geographic Information System (GIS) data covering, mapping, infrastructure buildings and roads, as well as details of local services, amenities, flooding, population and more. Access data directly from sources including, • Bing and Google Mapping • OpenStreetMap • Ordnance Survey • And UK Government Data Providing the unique ability to port GIS data directly into everyday Caddie .dwg drawings, the Caddie GIS is for those wishing to create informed and substantive designs without the need to invest in expensive alternative software and time-consuming data reformatting. |
 |
International Sales UK +44 (0) 1234 834920 email: This email address is being protected from spambots. You need JavaScript enabled to view it..uk |
|
South Africa Sales SA +27 (0) 12 644 0300 email: This email address is being protected from spambots. You need JavaScript enabled to view it. |
|
Online Training |
 |
Learn More... |
 |
Caddie Educational *FREE for Students and Educators |
| *Caddie Educational is FREE for Students and Educators at qualifying institutions (non-commercial use) | |
| All trademarks acknowledged | |
The Common Folders (Such As Plotstyles) Have Moved From Caddie 16 - Where are They Now?
- Category: Installation & Troubleshooting
- Thursday, 07 November 2013 02:05
Applies To
Caddie 16
Question
Where are the default locations for the various user settings, such as plotstyles, templates and fonts etc.
Answer
Prior to Caddie 16 the default common and user, folders and files, such as Plotstyles, Styles, Hatches, Templates etc., where contained within the Caddie installation folder. Over the years the security of the Windows® operating system has been tightened and access to folders within the 'Program Files' folder needs special privileges.
To comply with Microsoft® standards, from Caddie 16 these "User" folders and files have been moved to a more accessible folder within the Windows® environment. Depending with variety of operation system you have will depend where the folders are and what they are called. In order to make accessing these folders easy, Caddie has added a section 'MENU | UTILITIES | BROWSE'. Here you will find two links:
Common Application Files & Folders
These are the ones that every user can access and includeds some or all of the following
Folders
Backup
Block Libraries
Config Data
Fonts Hatch
Linestyles
Plotstyles Styles
Files (Caddie Defaults)
Arch-SA.ldf (Arch-SA Layer Definition)
Caddie.ks (Keyboard Shortcut)
Caddie.ldf (Caddie Layer Defination)
USCommon.dic (Dictionary)
USMain.dic (Dictionary)
USUser.dic (Dictionary)
User Folders & Files
These are the Files & folders specific to the current logged in user and includeds the following:
Note
You can specify the actual folder used using 'SETTINGS | ENVIRONMENTAL SETTINGS | FOLDERS'. This is also a good place to check the folder paths you may have previously set up.
Installing Caddie
- Category: Installation & Troubleshooting
- Tuesday, 14 September 2010 16:21
SUBJECT LIST
Introduction
Installing Caddie
Installing Vio
Running Caddie for the First Time
What To Do If Caddie Runs in Demo Mode
Updating the Dongle Security Key
Mainenance Date Is reported Incorrectly
Installing Network Dongles
INTRODUCTION
Please read the following guide before installing Caddie.
Using the standard options, the installation of Caddie should be straight forward.
The installation process will vary depending on the license you have. There are three types of license:
- Softlock License
The period of the license can be purchased. This is issued for a short term rental of Caddie or a Student license. At the end of the time period the license will revert to Demo
If no time has been purchased the license is Evaluation and lasts for 14 days. After 14 days the license reverts to DEMO. It can be converted to any other license at any time.
The licence for a softlock is a one off per computer, regardless of software version, and is not transferable between computers.
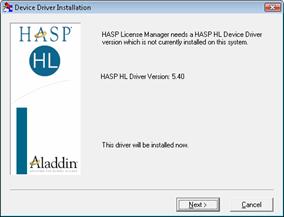
- Hardware License (Dongle / HASP)
Full Caddie, needs a Hardware key which also needs an additional driver to be installed (see below)
- Network License (Network Dongle / HASP)
Needs a special hardware key and additional License Manager software to be installed on the Network Dongle Server. This is covered at the end of this document.
Evaluation - The Evaluation license lasts for 14 days. Caddie will automatically be in Evaluation when Caddie runs for the first time or is the selected license.
Demo is a full installation without the requirement of any hardware or software license. The only limitation is the ability to save or copy drawings or drawing elements (including backups). Caddie will run in ‘DEMO’ mode when:
- The Softlock 14 day evaluation period has finished
- A hardware dongle is not present at the time of Caddie loading or it has been removed with Caddie running. Note if the dongle has been removed or has failed to work dure to system reasons, Caddie will need to be re-started with the dongle in place and working.
- The hardware dongle has not been authorised
- There are no more Network licenses available
- Incorrect HASP driver has been installed
INSTALLATION
INSTALLING CADDIE
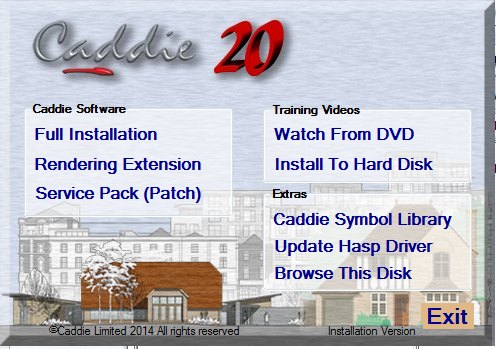
Full Instalation
From the dialogue, select Full Installation and follow the installation prompts and do a Typical installation. Caddie also requires some Microsoft TM Operating System files to be downloaded and installed. This will be done automatically so let caddie do this. If these are blocked by your fire wall or not run, Caddie will not run correctly.
Redering Extrension
This is normally installed at the same time as Caddie. If it need to be installed separately from the dialogue, select Rendering Extension to install Caddie Vio photo-realistic rendering integrated into Caddie Professional.
Symbol Library
You will normally be asked if you want to install the symbol library. If it needs to be installed separately, this can be done by selecting Caddie Symbol Library from the menu.
Training Videos
From the dialogue, select Install To Hard Disk to install the Caddie training videos.
Note these training videos are on the Installation disk and not the What’s new video disk. The Video disk is designed to play from a standard video recorder or a computer with the correct programme and drivers. Additional drivers for a computer can be found by “Browsing This Disk” from the installation menu and running the file in the “VLC” folder.
RUNNING CADDIE FOR THE FIRST TIME
Plug Dongle In
(Skip this step if you have an Evaluation or a Time limited license.)
If you have been provided with a Dongle Key (HASP) then now is the time to plug it in. Insert the dongle into a convenient USB socket and wait for it to light.
Run Caddie
When Caddie runs for the first time there are a number of settings that need to be finalised so you will see the following dialogue.
(If this is a Caddie 18 reinstall, this step maybe ignored so go to “What to do if Caddie runs in Demo Mode”)
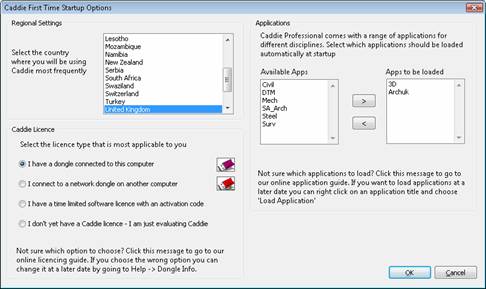
- Select your region
- Select the License type.
Choose one of the following depending which licence you have (the introduction explained the various licence types).
- I have a Dongle Key (HASP) choose
‘I have a dongle connected to this computer’
- I have a network dongle choose
‘I connect to a network dongle on another computer’
(see separate instructions for installing a network dongle).
- I have a time limited license (softlock), you will not have a dongle and you will have an activation code choose
‘I have a time limited software license with an activation code’
- I am evaluating a version of Caddie for the first time
‘I don’t have a Caddie License – I am evaluating Caddie’
If the Evaluation has expired Caddie will run in Demo Mode.
3. Select the applications you want to load.0- A suggested selection is either ArchUK or SA_Arch and 3D.
- (You can right-click on the Caddie application button when in Caddie to load and unload applications at any time.)
Caddie may restart a number of time during this proicess.
WHAT TO DO IF CADDIE RUNS IN DEMO MODE
Caddie will run in Demo Mode if any of the following occurs
Your Time Lock period has elapsed
If you have an Education version or a load of caddie there will be a time period associated with you licence. Once this has expired caddie will revert to the Demo mode. If you need to extend this period Please contact Caddie. Note the softlock licence is on a per-machine basis and cannot be transferred. Contact Caddie for further information.
Your Evaluation period has elapsed
The standard evaluation period is 14 days
You haven’t inserted your HASP key (dongle) if you have one.
If you have a USB dongle. This needs to be inserted and lit in order for Caddie to recognise it and before caddie is run. If it is not recognised this can be because the drivers have not been installed or are to wrong ones for you operation system. If the dongle is lit then all you may need to do is fllow the instructions below, to obtain the security file.
Your need to obtain a security file
Your dongle may be lit but the security file is the incorrect one for your licence. If you are a maintained user then follow the step s below.
Updating the Dongle information
 |
 |
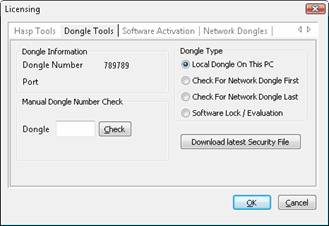
If it Has a number
- You are running in either Evaluation or Demo mode. If this is required then there is nothing else to do
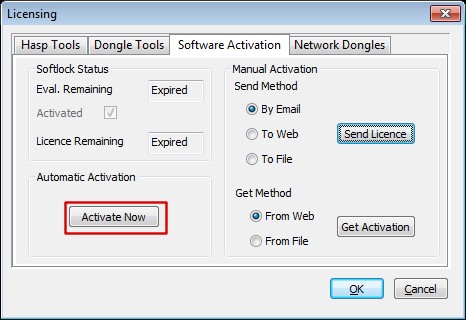
- If you have a Softlock then you will need to activate your license. The easiest way is to connect your computer to the internet and select the ACTIVATE NOW button. Manual activating is also possible by selecting your required options.
- If you have a dongle select the ”Download Latest Security File” button. Once done you will get the following message.
If you have a firewall or your Windows security blocks the replacement of the file you will have to first remove the existing one manually. To do this go to MENU | | HELP | WINDOWS EXPLORER. This should open Windows Explorer at the Caddie folder. Find a file called MSDBUTILS.DLL and delete it. Now try the Download Latest Security File“ again.
If dongle number is blank
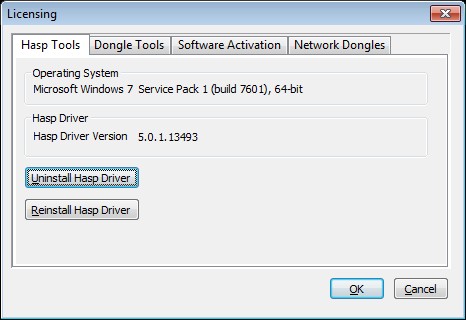
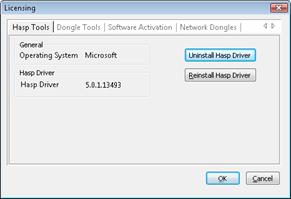
If you have a Dongle and it is plugged in and lit, run the Uninstall Hasp Driver followed by a Reinstall Hasp Driver from the Hasp Tools Tab. Note the driver installed should be as shown or higher.
MAINTENANCE DATE IS REPORTED INCORRECTLY
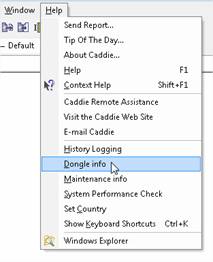
Caddie has an inbuilt notification of the maintenance date for the dongle currently plugged in. This date is normally set from the online database and in some cases may take some time to update. However if you wish you manually update the date for the dongle, go to HELP > MAINTENANCE INFO. If you don't know what your maintenance date is, contact Caddie support.
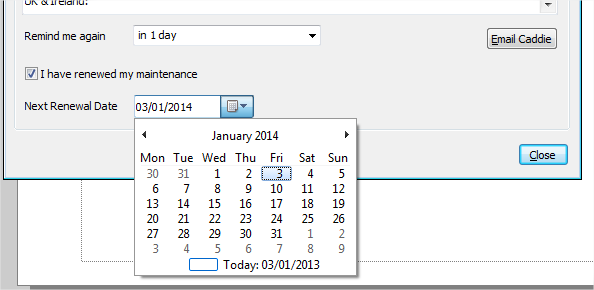
Tick the box “I have renewed my maintenance” and set to date to the correct date of maintenance expiry. If this is unknown, contact Advanced Computer Solutions for the date on record.
Note: If this is the first year of using Caddie then the date will usually be the initial invoice date. If you have already updated your maintenance an email would have been sent with the new expiry date. In some cases the invoice for any updates may include the expiry date.
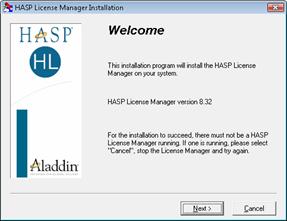
INSTALLING NETWORK DONGLES
Before installing the Network Dongle
On the Dongle Server:
 |
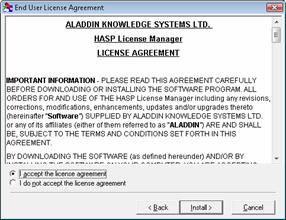 |
| Check the driver is 8.32 or higher. Select ’NEXT’ | Accept the licence and click ’INSTALL’ |
 |
 |
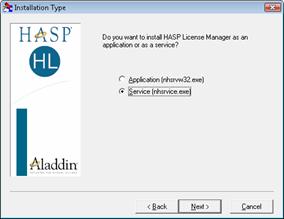
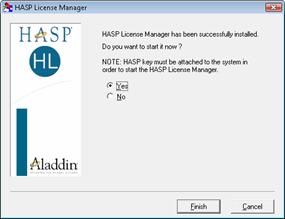
| You can install the Licence Manager as a service or load it at start up. It is preferably to load it as a Service. Select the required option and ’NEXT’ |
Use the default install path (you can change it if required). Select ’NEXT’ |
 |
 |
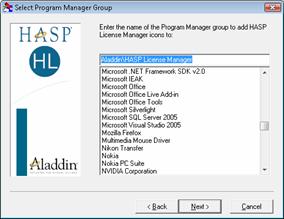
| Use the provided group name and ’NEXT’ | Select ’NEXT’ and the Licence Manager will be installed. |
| If you have a Network HASP plug into a spare USB socket and wait for it to light. If it doesn’t light reinstall the HASP driver from the Install menu on the CD or form ’CADDIE | HEPL | DONGLE INFO’ and the HASP TOOLS tab (see above). |
 |
| Then select ’FINISH’ |
On the Caddie Workstations
After following the above procedure, the Network dongle should work.
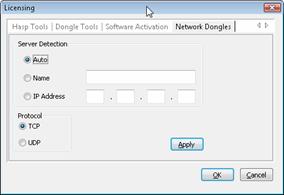
Setting the Network Address
Installing Caddie 18 on a Microsoft Windows 8 Computer
- Category: Installation & Troubleshooting
- Friday, 26 October 2012 17:07
Applies to
Caddie 18 and later. Note that no previous versions will work on Windows 8
Question
When installing Caddie on a computer with a Windows 8 operating system, Caddie fails to find the dongle. What do I need to do?
Solution
Currently the installation of the dongle driver (HASP driver) on a computer with a Windows 8 operating system requires a different driver from the default one installed. This driver will have to be installed after Caddie has been installed.
If Caddie 18 was installed from a DVD there will be a file with the following name in the specified path
.\Drivers\Aladdin\HDD32\Caddie_Hasp_6_51.exe
If you do not have a disk for Caddie 18 the Windows 8 dongle (HASP) driver can be downloaded from the downloads section of the website
Note: you will have to login for permissions to download this file.
After Caddie is installed run the dongle (HASP) driver that you have (disk or download as mentioned). This will install the correct driver for Windows 8.
To Install
- Download the file to the local computer (make a note where it is saved).
- Right Click on the downloaded file and select 'Send To', Select 'Desktop (create shortcut)' from the list that appears.
This will create a shortcut on the desktop. - Locate the shortcut and right click it then select Properties.
- In the 'Target' box add -r to the end of the line (Note this is a space followed by -r).
The target will now look something like:
C:\Downloads\Caddie_Hasp_6_51.exe -r -purge (assuming the file was downloaded to 'c:\Downloads')
- Select OK to close the dialogue.
- Double click the shortcut - A small progress box should be displayed and after a few minutes it should read 'Operation Completed Successfully'.
- Click OK to close the progress box.
If User Account Control is set to a high level, you may have to confirm your permission for the program to run.
- Locate the shortcut again and right click and select Properties.
- In the 'Target' box, change the last character from r to i.
The target will now look something like:
C:\Downloads\Caddie_Hasp_6_51.exe -i (assuming the file was downloaded to 'c:\Downloads')
- Select OK to close the dialogue.
- Double click the shortcut - A small progress box should be displayed and after a few minutes it should read 'Operation Completed Successfully'.
- Click OK to close the progress box.
If User Account Control is set to a high level, you may have to confirm your permission for the program to run.
The above assumes that the latest driver downloaded was Caddie_Hasp_6_51.exe. Change the name in the above commands as appropriate for the version downloaded
The hasp driver is now installed
Note: You must have administrator permissions to perform the above task.
If for any reason any of the above tasks fail, then you should change the User Account Control (UAC) settings.
To do this type UAC in the Start menu search bar and choose "Change User Account Control". Change the slider to the lowest level.
Also set the Privilege level by right clicking the shortcut and from the Compatibility tab tick the 'Run as Administrator' tick box, and retry.
To check that the driver is correctly loaded open a web browser page and go to: //localhost:1947
If the driver is correctly loaded that should take you to the Sentinel Admin Control Center Page where you can see the status of your dongles and softlock licenses. If you are unable to display the page, check that the driver was installed correctly and also check that you have no firewalls etc. blocking access.
Caddie Only Starts in Demo Mode
- Category: Installation & Troubleshooting
- Monday, 20 December 2010 18:35
APPLIES TO
Caddie 16 and above
QUESTION
I am a registered user of Caddie but when I run a newly installed Caddie I get a Message saying:
"No Dongle found or you are not authorized to use it.
Continue loading the DEMO version?"
ANSWER
You may get this message for a number of reasons.
- You installed a copy of Caddie that didn't recognise your dongle.
- You are not licensed to use this version.
- If you have a dongle it is un-plugged.
- The Dongle has not been correctly installed.
If you have a USB dongle check that it is lit.
From Caddie 16 a new Dongle driver is used. This new driver is compatible with all USB dongles and some later Parallel Port dongles. If your parallel port dongle has the embossed word "HASP" followed by a registration mark then it will need to be changed. If after following these instruction you still have problems, contact Caddie support.
- You are not authorised for this version of software.
IMPORTANT
If you have a dongle but haven't plugged it it, cancel Caddie, plug the dongle in and restart Caddie.
If you are using Windows Vista, Windows 7 or Windows 8 run Caddie.in 'Administrator Mode'. To do this right click the Caddie icon and select 'Run As Administrator'.
If using Windows XP, just run Caddie.
In all cases run Caddie in demo mode. Caddie will check that the dongle and the licence file match. If they don't you will be invited to download the latest security file.
You will be taken to the 'MENU | HELP | DONGLE INF dialogue.
If the dialogue isn't displayed, use the Help menu to open it.
If the dongle driver has been installed correctly, you should see the number of your dongle mentioned.
If it has a number
If you have a dongle select the ”Download Latest Security File” button. Once done you will get the following message.
Select 'YES' and Caddie will restart in the mode you are licensed for.
Your firewall or your Windows security may block the automatic replacement of the file. You will have to first remove the existing one manually. To do this go to ’MENU | | HELP | WINDOWS EXPLORER’. This should open Windows Explorer at the Caddie folder. Find a file called MSDBUTILS.DLL and delete it. Now try the ”Download Latest Security File ” again.
If dongle number is blank If you have a Dongle and it is plugged in and lit, run the ”Uninstall Hasp Driver” followed by a ’Reinstall Hasp Driver’ from the ’Hasp Tools’ Tab. Note the driver installed should be as shown or higher.
Key Words
Dongle, HASP, Caddie, Demo, Installing, CAD.
Activating my Caddie software?
- Category: Installation & Troubleshooting
- Thursday, 07 October 2010 14:26

Software Activation Procedure
| 1. Open Caddie in Demo/Evaluation mode |
|
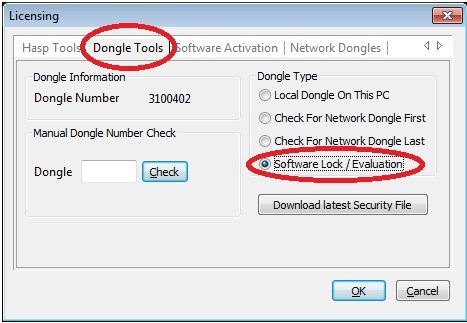
2. Make sure your Caddie setting is set to “Software Lock” in the dongle info. |
 |
3. Select “Dongle Tools” tab, and then the “Software Lock/Evaluation” option, and click OK. |
 |
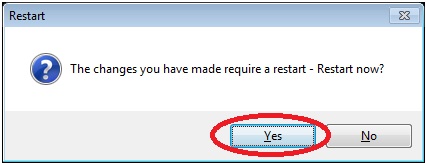
4. Caddie will then ask you to restart for the settings to take effect, click “Yes” and wait for Caddie to start again. |
 |
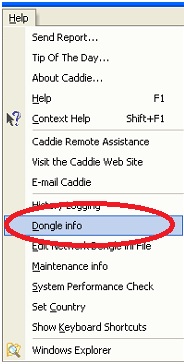
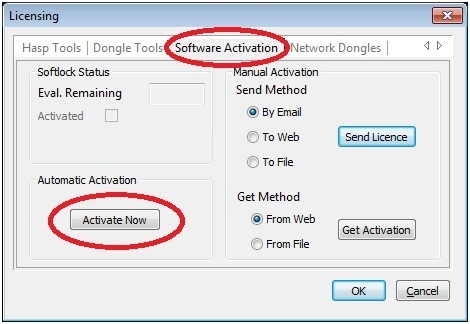
| 5. When Caddie re-opened, again click on “Help”|”Dongle Info”, and go to the “Software Activation” tab. In the “Automatic Activation” box, click on “Activate Now”. |
 |
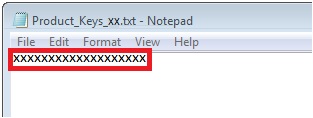
| 6. By now you should have received an email from one of our support personnel that sent you a Product key text file. It should start with Product_Keys_xx.txt. If not, your activation Text file will be located in the root folder on your Caddie disc. Open that file with notepad. |
| 7. Copy this 19 digit code or write it down. |
 |
 |
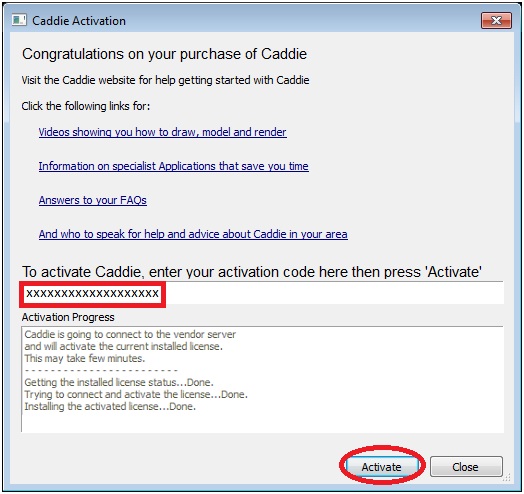
| 8. Once you clicked on “Activate Now”, this will produce a pop-up which will give you the opportunity to enter your activation code. You can either paste or type it in. |
 |
|
9. Click on “Activate”, you will see a message in the Activation Progress bar when the activation was successful.
10. Close the window when Activation was successful.
11. Please Restart your Caddie, and now it should start with your Licence (Educational/Professional/Budget). |
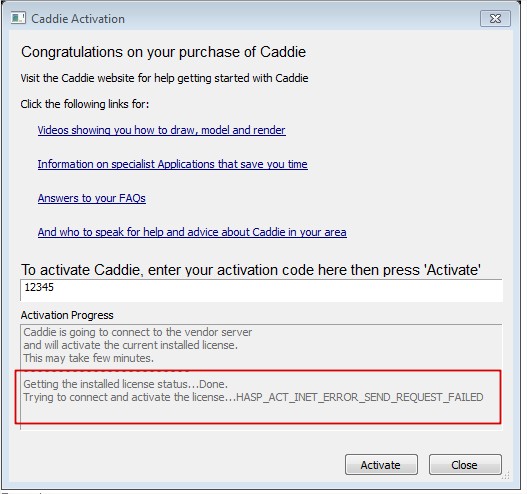
UNABLE TO ACTIVATEIf you get a message similar to that below, it usually means there is no connection to the Caddie Activation Server.
There can be a number of reasons why you will get this or similar messages..
|
SA Offices: +27 (0) 12 644 0300 (0861 CADDIE)
UK Offices: +44 (0) 1234 834920
Importing Screen Layouts From Previous Versions
- Category: Installation & Troubleshooting
- Tuesday, 14 February 2012 11:42
Applies to
Caddie 17 build 2 and later
Question
How can I import a screen layout from a previous version of Caddie?.
Solution
Caddie 17 build 2 has a new direct import of screen layouts from Caddie 16. After installing Caddie 17 you will be asked if you want to migrate your settings from a previous version. If you select 'Yes', one of the options will be to import your screen layout.
If you have already been past this step and resplied 'No', you can get back to this option at any time by going to Utilities -> System -> Migrate Settings from Caddie 16.
Note that this option is only valid for importing settings from the previous major release of Caddie.
An error occurs when accessing Help Dongle Info
- Category: Installation & Troubleshooting
- Wednesday, 18 January 2012 15:32
Applies to
Caddie 16 and later
Windows 7
Symptoms
When accessing the Help -> Dongle Info command Caddie throws an error.
Solution
This can occur if the softlock licence was not correctly installed. To rectify the problem try the following:
From the Start Menu right choose All Programs -> Caddie 17 then from the options, right click Custom Hasp Driver Installer and choose run as administrator.
The installation should complete without any errors. If an error occurs, download the latest driver from the hasp website - www.hasp.com
At the time of writing, the download page is: http://www3.safenet-inc.com/support/hasp-srm/enduser.aspx
The driver to download is the latest Sentinel HASP Run-time GUI Installation. After downloading it run the installation. After completing the installation repeat the first step as follows:
From the Start Menu right choose All Programs -> Caddie 17 then from the options, right click Custom Hasp Driver Installer and choose run as administrator.
This time the installer should prompt that a later driver is already installed and only the licence file will be installed. Click OK to confirm
Start Caddie and check that the Help -> Dongle Info is now ok.
Why can't I save my Screen Layouts?
- Category: Installation & Troubleshooting
- Monday, 10 October 2011 10:25
Applies To:
Caddie 16 onwards
Windows Vista, Windows 7
Question:
I try to save a screen layout and I get the message there is no layout to save. What is the problem?
or
I try to import a screen layout, but nothing changes, why?
Answer:
This is usually only with a 64 bit operating system and is usually due to the security settings on your computer.
In order to save a screen layout or to import a screen layout, Caddie must be run as an administrator. To do this run Caddie by right clicking the Caddie launch icon from the Start | Programs menu and choose 'Run As Administrator'.
Note:
You can not do this from a pinned icon on the Quick Launch bar.
Microsoft .NET Framework Install error
- Category: Installation & Troubleshooting
- Tuesday, 27 September 2011 09:31
If you have tried to install Caddie 17, and you received an error with the .NET 4 Framework installation, this article could help you to solve the problem.
The .NET Framework is a prerequisite that enables Caddie to run. Caddie 17 requires .NET 4 Framework to be installed in order to be able to open and run successfully.
So if you received the "HRESULT: 0xc8000222" error with the .NET installation, according to Microsoft's website "This behavior may occur if the temporary folder of Windows Update has been corrupted".
According to the Microsoft support website, that temporary folder needs to be renamed and the following steps can be taken to resolve the problem:
You can be assured that the folder will be created again once you visit the Windows Update site again.
- Click Start, Run, type: cmd and press Enter. Please type the following command in the opened window.
net stop WuAuServ - Click Start, Run, type: %windir% and press Enter.
- In the opened folder, rename the folder SoftwareDistribution to SDold.
- Click Start, Run, type: cmd and press Enter.
Please run the following command in the opened window.
net start WuAuServ
5. Type exit and press Enter.
Now you should be able to run the .NET setup again, this time from the Caddie installation disc. To do that, please follow these steps:
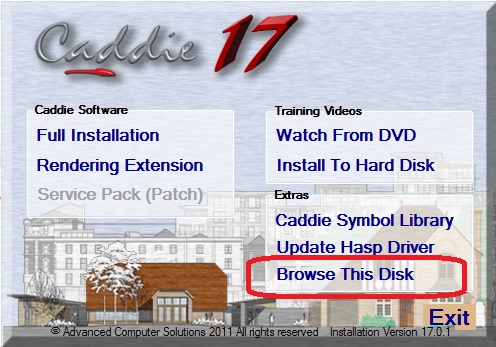
- Browse to the Caddie 17 Disc, by clicking the "Browse This Disk" option from the setup menu.
- Open the "Prerequisites" folder and run the "dotNetFx40_Client_x86_x64.exe"
- Continue to go through all the steps and finish the installation. It should now install without any errors.
Caddie will now be able to run successfully without any problems. Please contact Caddie Support if you need any further assistance.
MSVCR100.DLL is missing
- Category: Installation & Troubleshooting
- Wednesday, 15 December 2010 14:47
APPLIES TO
- Caddie 18 and later
QUESTION
Trying to start Caddie I get a message stating MSVCR100.DLL is missing
ANSWER
Caddie requires the Microsoft Visual Studio 2010 C++ redistributables to be installed on the PC. These can be downloaded directly from the microsoft site.
OTHER FAQ's
None
Should I use a Peer to Peer or Domain based network?
- Category: Installation & Troubleshooting
- Friday, 06 May 2011 02:00
This is a question we hear frequently.
A peer to peer network is a configuration that was popular in the early nineties with the release of Microsoft Windows for Workgroups. Peer to peer networks were easy to setup and required only a basic knowledge of computer networking. In Windows XP, this technology is often referred to as "File & Printer Sharing."
Many businesses resist establishing a domain due to their belief that a peer to peer network is quicker and therefore cheaper to setup. However, establishing a domain provides your business with a complete business solution that will serve your needs now and into the future. It provides you with a central location from which to manage your network - simplifying your network and therefore dramatically reducing technical support and associated costs.
The following are the basic differences between the two architectures:
The Peer To Peer Network
- A peer to peer network does not require a server. However it is not uncommon for users to designate one machine as a server on the network, configured like any other workstation.
- In a "peer to peer" network, each workstation on the network must be separately configured.
- The management of the network is spread out amongst all workstations on the network. When a technical issue arises, it often has to be addressed on each workstation.
- For each user to have access to each workstation, a user account must be created on each workstation.
- Shared drives must be mapped manually from each workstation.
- Shared printers must be manually connected and printer drivers installed on each workstation.
- The user account names must exist and match on each machine where document sharing is required.
- In a peer to peer network, company data and electronic mail is stored on various workstations throughout the network rather than being stored in one central location. The daily backup job if one exists is therefore not able to backup all company data because it is not in one central location. Backup becomes laborious and is often neglected.
The Domain Environment
- The domain environment requires a server running the Windows Server operating system. The server is then configured as a domain controller.
- The user accounts for the network are created in one place - on the server. The workstations on the network are then simply joined to the domain which allows staff members to utilize their user accounts.
- The management of the network is conducted from one place - on the server. When a technical issue arises, it is typically addressed from one place (on the server) which often resolves the problem for the workstations on the network as well.
- When a user logs in to the network, the server grants access to files and directories as defined by the business owner and/or network administrator. In addition, they are passed through a login script which maps common network drive letters throughout the network.
- For a user to have access to a printer, they are simply connected to a print queue on the server. The print driver is only installed once on the server and the workstations are then connected to the print queue.
- All data in the domain is then typically stored in one place - on the server. The daily backup then ensures that all data such as company files and electronic mail are backed up from this location on a daily basis.
From the above information you can see that although the initial outlay on hardware and software may be slightly higher establishing a domain based network, the long term and even short term costs will be significantly less if you take into account time. Coupled with the fact that data security and integrity are significantly better, for most businesses the domain model is the only one that makes sense.
Caddie 9 and 64 bit Windows 7
- Category: Installation & Troubleshooting
- Wednesday, 16 March 2011 19:19
How can I pause and re-start a download of large files
- Category: Installation & Troubleshooting
- Friday, 24 December 2010 11:27
Applies To
No specific operating system or Caddie version
Question
When I download Caddie, which is a very large file, my connection sometimes breaks and I have to start all over again. I also have a very slow connection and I would like to speed this up and have the ability to break the download up into small chunks. Is there a way to do this.
Answer
Yes there is a way to do all of these things. What you need is to download and install one of the many download accelerators or download managers. There are many available. Some have to be paid for, some have free limited use and some are totally free. Even the paid for versions usually have a free trail period. Some work standalone and some will be installed as add-ons for your favourite internet browser.
Which ever you choose they all will resolve the three main requirements.
Speed up the download time.
Whilst these programmes don't really speed up the download, what they do is to make more than one download connection and split the download over these connections and reasemble it after the download. The net result is a faster download.
Restart the download without restarting from the beginning again
Because they way these accelerators work, they are able to recognise how much of the download has been made, so that in case of connection breaks, a restart will first check the position of the previous download and restart from that position. So in other words, if 80% had been downloaded then when a download of the same file is down only the last 20% will need to be downloaded.
Pause the download
Similar to the last requirement, the download can be paused and then resumed at a later time.
In addition some will even send you computer to standby, hibernate or even shutdown, so you can leave it running and when it is finished downloading your computer will do what ever you have selected.
What one you use will be up to your personal preference.
Here are a couple to lookout for.
![]()
Speedbit home page
DAP can be integrated with various browsers such as Microsoft IE, Firefox, Google Chrome, Opera and Netscape.
This seems to be the web favorite.
![]()
IE6,IE7,IE8 and Firefox are supported
For Google Chrome users there is this extension
NOTE
After a downloading check the size of the downloaded file matches what is stated on the Caddie site. If the size if different from that stated, i.e it is too small, it is probable due to a firewall not allowing access to the download. This can be rectified either by setting your firewall to allow your download manager to connect automatically or temporally unblock you firewall.
ACS (Caddie) does not endorse any of these or other download accelerator products and therefore can not offer support for them. Please use the providers sites for support.
Caddie says Softlock Not in Use or is Expired
- Category: Installation & Troubleshooting
- Thursday, 09 February 2012 12:49
If a previously working Caddie says 'Softlock not in use, or is expired' there may be several causes.
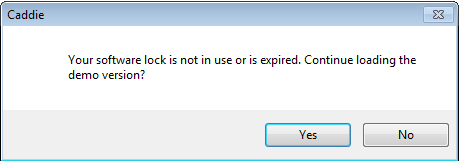
1. The softlocks are time limited and may have expired
2. Caddie may be unable to communicate with the softlock due to firewall issues etc. (Caddie requires port 1947 to be open)
3. The Sentinel Hasp license manager may have stopped
To check if the licence manager is stopped, From the start menu type services.msc into the search box and the services dialogue should open. Scroll down to find Sentinel Local License Manager and ensure it is running. If not select it and click the Start option. Close the services dialogue and restart Caddie.
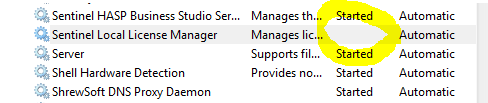
Alternatively, restart the PC and the license manager should be restarted automatically.
Caddie doesn't want to open on Windows 7
- Category: Installation & Troubleshooting
- Tuesday, 26 October 2010 13:06
Applies To
All versions of Caddie from Version 16
Answer
If you are experiencing problems with Caddie not opening on Windows 7, either giving you an error straight away or just opening and closing in the processes (Task Manager), it could be that you do not have an appropriate screencard driver. It is not the definite problem, but it is a step towards eliminating the elements that could cause the problem.
Please note that this is not applicable to you if your Caddie has opened before on that exact same PC and operating system. This is if your Caddie doesnt want to open First time around.
The problem here is that when your Windows 7 was installed, it installed a screencard driver that was from Microsoft. This is a very nice feature from Windows 7, but this driver is not designed for applications that need hardware acceleration standards such as the drivers from the Manufacturer of the screencard itself. And this is where the problem lies. You need to update your drivers to the latest manufacturer driver.
To troubleshoot your problem to see if you are on the right track, you can do the following check:
1. On your Desktop, right click and go to "Screen Resolution".
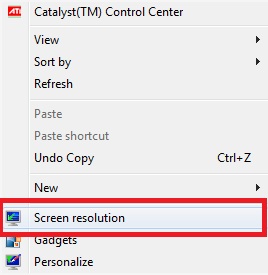
2. On the right hand side, click on "Advanced Settings"
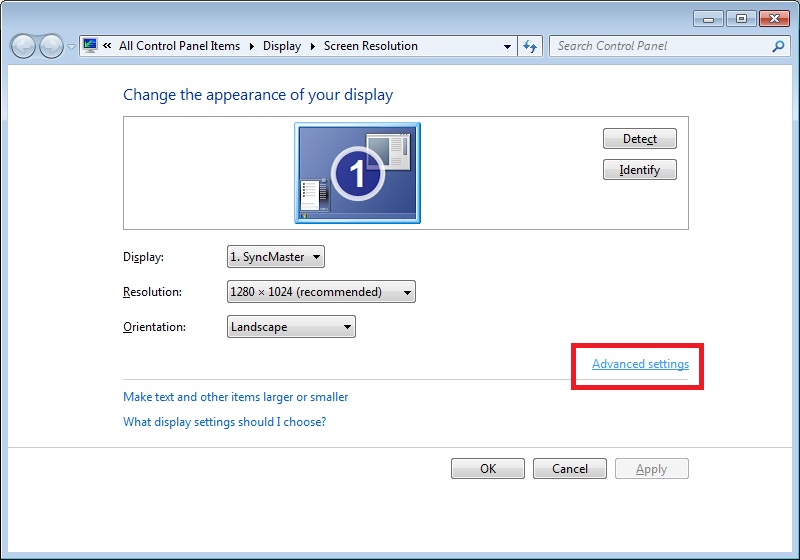
3. Then you will see you current screencard name. And if it has the Microsoft driver installed, it will show in brackets next to the name (Microsoft Corporation XXXX). If this is the case, the first step will be to download the latest drivers from the manufacturer website for that specific screencard, and install it afterwards. If this still doesnt sort out your problem, please contact Caddie support.
How to install the HASP Driver on Windows 7
- Category: Installation & Troubleshooting
- Friday, 07 May 2010 15:07
To Run Caddie on a Windows 7 computer the latest HASP Driver (dongle driver) is required.
This can be downloaded from the following link:
Note: to see the download button on the link you will need to log in.
To Install
- Download the file to the local computer (make a note where it is saved).
- Right Click on the downloaded file and select 'Send To', Select 'Desktop (create shortcut)' from the list that appears.
This will create a shortcut on the desktop. - Locate the shortcut and right click it then select Properties.
- In the 'Target' box add -r to the end of the line (Note this is a space followed by -r).
The target will now look something like:
C:\Downloads\haspdinst.exe -r (assuming the file was downloaded to 'c:\Downloads')
- Select OK to close the dialogue.
- Double click the shortcut - A small progress box should be displayed and after a few minutes it should read 'Operation Completed Successfully'.
- Click OK to close the progress box.
If User Account Control is set to a high level, you may have to confirm your permission for the program to run.
- Locate the shortcut again and right click and select Properties.
- In the 'Target' box, change the last character from r to i.
The target will now look something like:
C:\Downloads\haspdinst.exe -i (assuming the file was downloaded to 'c:\Downloads')
- Select OK to close the dialogue.
- Double click the shortcut - A small progress box should be displayed and after a few minutes it should read 'Operation Completed Successfully'.
- Click OK to close the progress box.
If User Account Control is set to a high level, you may have to confirm your permission for the program to run.
The hasp driver is now installed.
Note: You must have administrator permissions to perform the above task.
If for any reason any of the above tasks fail, then you should change the User Account Control (UAC) settings.
To do this type UAC in the Start menu search bar and choose "Change User Account Control". Change the slider to the lowest level.
Also set the Privilege level by right clicking the shortcut and from the Compatibility tab tick the 'Run as Administrator' tick box, and retry.
I get 'Side by side configuration' error when first starting Caddie after installation
- Category: Installation & Troubleshooting
- Sunday, 07 March 2010 10:36
Cause: The error message can be caused by the Visual Studio C++ 2005 Redistributable not being installed on the computer.
Solution: Download and install Microsoft Visual Studio C++ 2005 redistributable from the Microsoft website (http://www.microsoft.com/downloads/details.aspx?familyid=32bc1bee-a3f9-4c13-9c99-220b62a191ee&displaylang=en)
What versions of Windows will Caddie run on?
- Category: Installation & Troubleshooting
- Sunday, 07 March 2010 10:35
ANSWER
Caddie 9.1 will run on Windows XP, Windows Vista and Windows 7 but only 32 bit versions. Version of operating system later than Windows XP may also change some of the functionality.
Caddie 9.1 will not run on Windows 8
Caddie 9.1 will not run on any operating system that is 64 bit.
It is possible In order to run these (excluding Windows 8) a Virtual OS has to be set up.
There is a FAQ elsewhere that describes how to do this.
Other versions prior to Caddie 15 may also be affected
All versions of Caddie from version 15 will run on 32 bit and 64 bit versions of XP, Vista and Windows 7. Only Caddie 18 is qualified to run on Windows 8

When I install Caddie it prompts to install a HASP Driver. What is this?
- Category: Installation & Troubleshooting
- Sunday, 07 March 2010 10:35
The HASP driver allows Caddie to communicate with the dongle (HASP) - the security device which is plugged into either the parallel port or the USB port.
Key Words
Dongle, HASP, Caddie, Demo, Installing, CAD.
How much RAM is required to run Caddie?
- Category: Installation & Troubleshooting
- Sunday, 07 March 2010 10:34
The amount of RAM that versions of Caddie 15 or higherof required depends on the operating system and what other applications will be run on workstation. Caddie can not be installed on any computer with less than 1 GB of ram. It is preferably to use 2 GB or 4 GB for larger drawings and 3D work.
If 4GB of RAM is installed on a 32 bit computer only around 3.5GB maximum will be used (an operating system limit).
On 64 bit machines it is recommended to install 8GB of RAM.
It is also recommended for versions of Caddie 17 or higher that a 64 bt machine with at least 8GB of RAM is used.
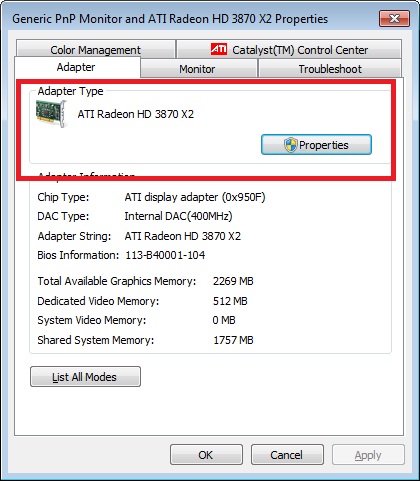
What are the recommended video cards for Caddie?
- Category: Installation & Troubleshooting
- Sunday, 07 March 2010 10:33
Caddie 15 and later uses OpenGL graphics libraries, so graphics cards specifically designed for OpenGL such as nVidia's Quadro range and ATI's FirePro range will give the best performance.
On board graphics should be avoided as these are generally designed to be used with general office software and not CAD or 3D programmes such as Caddie. If your computer has only an on board graphics processor (usually identified buy the graphics connector being one of the group of other connectors), purchasing and installing a standalone graphics card will greatly improve the display capabilities of your computer.
I currently have a Parallel dongle but my new computer doesn't have a parallel port. Can I change it for a USB dongle?
- Category: Installation & Troubleshooting
- Sunday, 07 March 2010 10:32
Why does Caddie require a dongle?
- Category: Installation & Troubleshooting
- Sunday, 07 March 2010 10:32
Do I need to uninstall my old version of Caddie before installing Caddie 15?
- Category: Installation & Troubleshooting
- Sunday, 07 March 2010 10:31
I have several CTB plotstyles from my old CAD system. Can I use these with Caddie?
- Category: Installation & Troubleshooting
- Sunday, 07 March 2010 10:30
Yes you can, on all versions of Caddie since Caddie 10. Copy the plotstyles into the plotstyles folder and Caddie will use them. To find out where the plotstyle folder is located, open Caddie then go to Settings -> Environment Settings and expand the Folders option.
Use the same technique if you get a plotstyle when you receive a drawing from a colleague that you are working with.
On Caddie 16 and later, you can get to the default plotstyles folder very easily by going to Utilitiess -> Browse -> Common Application Data Folder. In the list of folders you should see one called Plotstyles.
Can I use Caddie on a dual screen workstation?
- Category: Installation & Troubleshooting
- Sunday, 07 March 2010 10:29
Can I install Caddie 15 on several computers without violating the licence agreement?
- Category: Installation & Troubleshooting
- Monday, 11 August 2008 11:19
Yes you can. Caddie can be installed on as many computers as you like. However if you wish to save your work, when you start Caddie the dongle must be plugged in to that computer and must remain in for the entire working session. So if you want to use Caddie simultaneously on more than one computer you will need to purchase additional dongles (licences).
I have various .pat hatch patterns from my previous CAD system. Can I use these with a later version of Caddie?
- Category: Installation & Troubleshooting
- Sunday, 07 March 2010 10:27
Applies To
All versions of Caddie from Version 15
Answer
Yes you can. Copy the .pat files into the hatch folder and Caddie will use them. To find out where the hatch folder is located, open Caddie then go to
MENU->SETTINGS ->ENVIRONMENT SETTINGS
and expand the Folders option.
Alternatively (if using the default folders) go to
MENU->UTILITIES->BROWSE->COMMON APPLICATION FOLDER
This will open Windows explorer. There you will see a folder named "HATCH". It is in this folder where the Custom Hatch patterns (*.PAT) are stored. Caddie will automatically pick these up when required.