|
Caddie 19: What’s new and what it means for you
Choose your version and START downloading your copy of Caddie 19 NOW;
Follow this link to a Windows® Support page where you can learn how to tell whether your Operating System is 32 or 64Bit. Then read on to find out how this latest release will revolutionise your productivity…
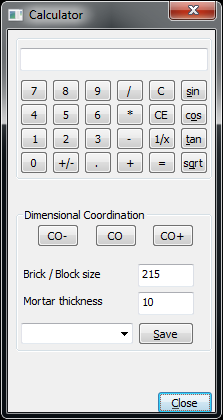
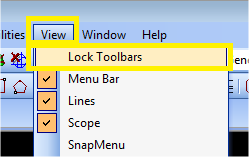
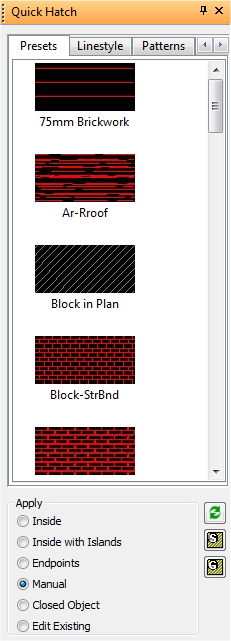
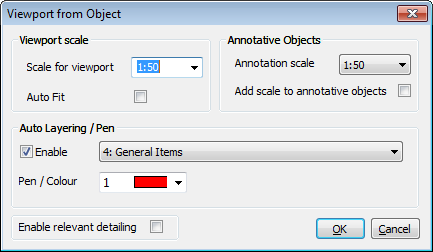
Caddie 19x64 – the fastest Caddie ever Yes, if you’re running a 64bit operating system such as, Windows 7® or Windows 8®, the wait is over, get cracking with Caddie 19 64 bit and start using all that lovely RAM on your machine to make using Caddie a sheer delight, faster loading, faster working, using bigger drawings and images too. If you’re still lumbering along on a 32 bit OS, don’t despair, you can still get Caddie 19 as there is a 32bit version too, but maybe now is the time to ask us about a new machine, especially if you’d rather be designing than waiting on the twirly circle or egg-timer. Typical user reaction to running Caddie 19x64 ‘It really flies on my 64bit PC; It looks a lot crisper too.’ 2013 version .Dwg drawing format Simple is Great – Caddie 19 tackles the Basics Another sweet little touch is the enhancement that lets you access those higher pen numbers simply by typing in the number required, no more endless scrolling when trying to select your favourite pens further down the list. PI (π) and Buffer have been added to the Caddie Calculator function. If you haven’t used these yet, then it’s worth knowing that when measuring in Caddie, the measured distance is placed in the Buffer – accessible from a right click in the Offset commands for instance, and that Caddie also has a calculator function that makes dimensional coordination a synch. So if you’re not familiar with these yet, maybe it’s worth a ‘gen’ up from the Help files. Object Properties. For users who like to be kept informed, the update to the dock-able Object Properties dialogue will be an essential new feature, displaying the current Model Space settings or Object Properties without the need to call from the Right-Click CSM. Circles can now be drawn by specifying Diameter, Area and Circumference as well as Radius, so no more counting on the fingers or reaching for the calculator. In addition, Circle by 3 points has been given a haircut too, now you can hit enter after placing the second point and the circle is drawn by the points on the circumference. Environment Settings now lets you choose whether to Regen on switching Sheets, one of those Marmite type settings that you can now optimise for the way you work. Layer Display Setting Remembered. Another frustration beating tweak, this one, with all those painstaking selections of what to view and what not, being remembered on using Layer Display from the Context Sensitive Menu (CSM), so now you’ll have to find another way of swelling the swear-box party fund. Hatching Undo last Point. Ever snapped or picked a point you didn’t mean to when tracing the outline of a Hatch or Opaque and been frustrated by not being able to undo the error without either having to start again, or press on with a view to tackling it later, well this Undo last Point will make you a very happy bunny. Associative Hatch and Opaque now feature the revelatory option of Undo last point (just type U and hit enter to step back through as many points as you need) as well as the option to create these for a simple dragged 2 point rectangle, saving time for those who do it right first time, every time, and also for us mere mortals too. Text Enhanced Layer Control
Block Previews and Enhanced Attribute Editing Sheets and Viewports
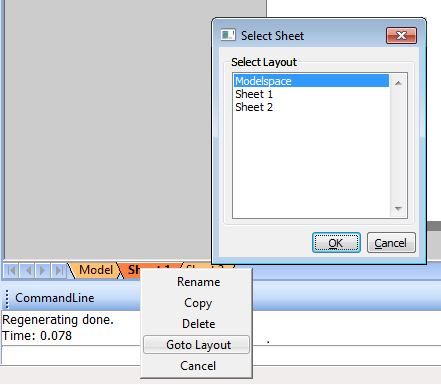
The Right-Click CSM Menu also offers some very nice enhancements that big users of Layout Sheets will really welcome, with navigation between Sheets simplified with the fabulous Goto option called from a Right-Click over the Model or any Sheet, as well as the option to Rename, Copy and Delete Sheets. Or Right-Click over the layout are itself and choose from a host of options from Reordering to Inserting Title Sheets, that are all directly under your cursor, without the need to go searching through multiple menus. Reposition Drawing is another of those very simple tools that really can make a huge material difference when working on multi-Sheeted, multi-Viewported drawings. If you’ve ever needed to move a drawing to somewhere else in your Model Space, maybe closer to the origin, maybe to give you more room for drawing that extra detail or whatever, you’ll know just how time consuming a job I could be to realign all the Viewports to the corresponding new areas in the Model Space; well no longer, use the Reposition Drawing… under File|Drawing Utilities and your drawing is sorted in one, it’s a real time saver.
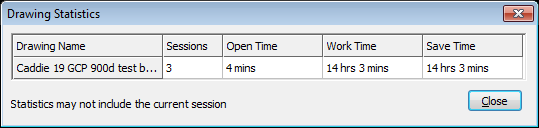
Time–Tracker and Drawing Management If you’ve ever been on the phone and needed to know how And the new Time-tracker also features export to spreadsheet options too, so now there is no excuse for not knowing where your fees are generated; give it a try by enabling the logging under General Setting in the Time-tracker Configuration.
Miscellaneous Tools
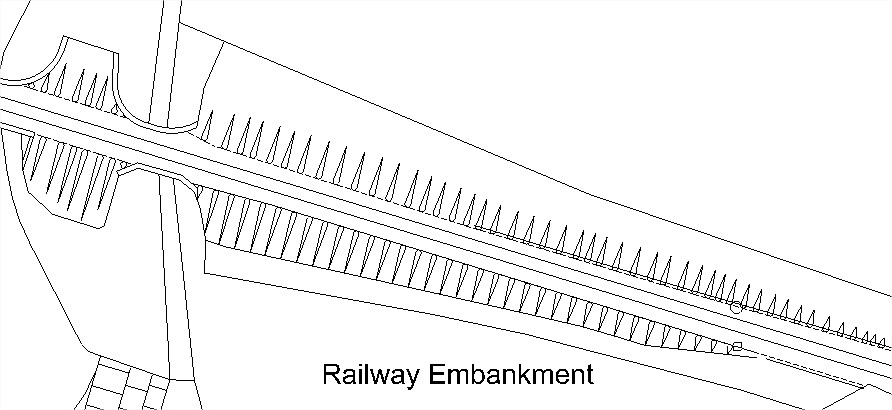
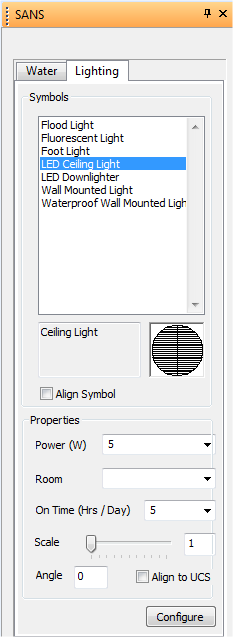
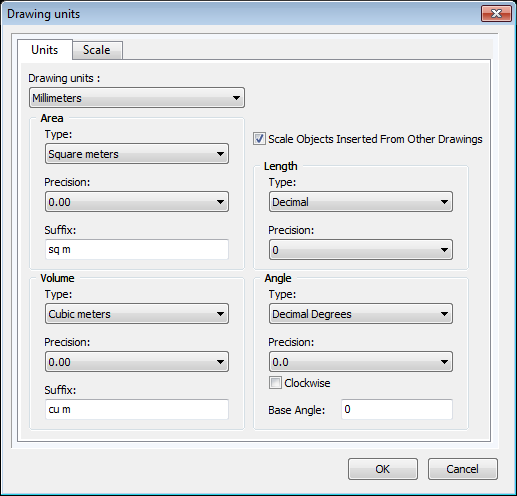
Embankment is a new tool under the CIVIL App in Caddie 19 under GA’S that just does what it ‘says on the tin’, and something that anyone that’s ever needed to draw embankment ‘symbols’ will appreciate as a real winner. Simply put, draw a Polyline for the top, a Polyline for the bottom, pick them in order then indicate where the ‘symbols’ start and a first repeat. Quick, simple and all in line with the BS too. SANS Lighting can be found under the SA_Arch App as an addition to the SANS-Water Tool and brings a whole new level to the intelligent deployment of pre-drawn Symbols within drawings. The SANS Lighting tool offers Drag & Drop insertion of symbols along with the ability to include extra non-graphical information too in the form of Power, Room, and Time On in Hrs/Day, all of which can be scheduled automatically to provide details of power consumption for a given building. AEC Architectural and 3D Tools A show of hands at the User Group Meeting illustrated just how large the take-up of the AEC tools has been, with the majority of users present at the launch now using these tools in some form for generating either 2D plans or full-on intelligent 3D models. If you haven’t yet experienced the power of these tools Configure AEC Units. When using the AEC tools within Caddie the units you use and measure can be configured to provide this information in the format that’s most useful to you, for instance even though you draw in millimetres, you can decide to report your areas in square metres to, say, two decimal places, and so on. So, when you produce schedules from your drawings, the units will automatically be shown in the units you prefer, rather than having to manually convert, or build in routines to account for this.
AEC Levels. This is the tool that multi-level working has been waiting for, and one that at a stroke makes drawing floor plans (2D and 3D) arranged over each other, as they would be in the building itself, simple. Now it’s easy to keep track of anything from a buildings footprint to the vertical services, and all actioned by one simple Floor selection button.. By automating the settings for the UCS to set working level, Cut Plane to set view position, Layering by Object type, and creation and allocation of Layer Display Groups, the new Level tool delivers an elegant solution to the problem of stacking floor levels one on another, saving at least three separate operations each time you want to work on a different floor.
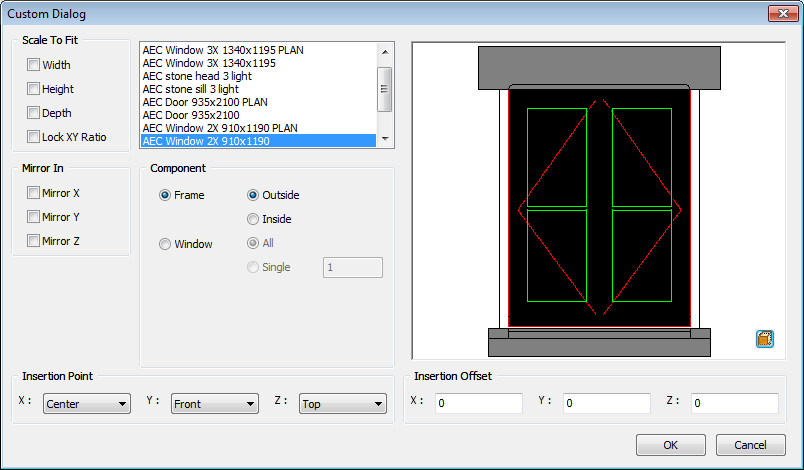
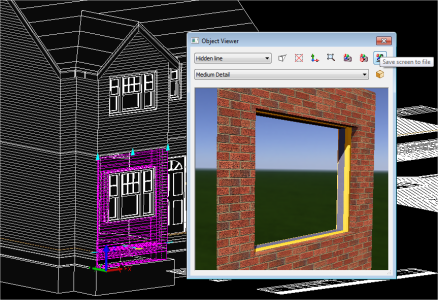
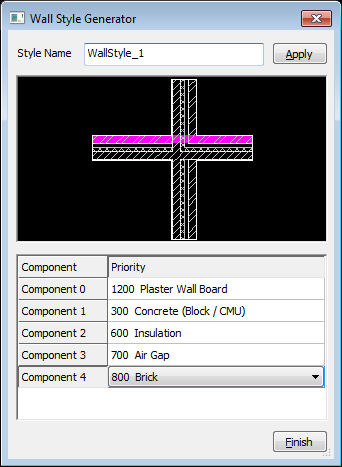
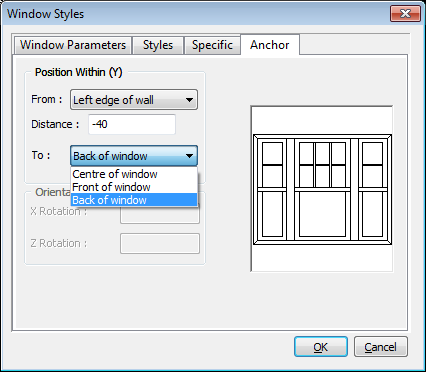
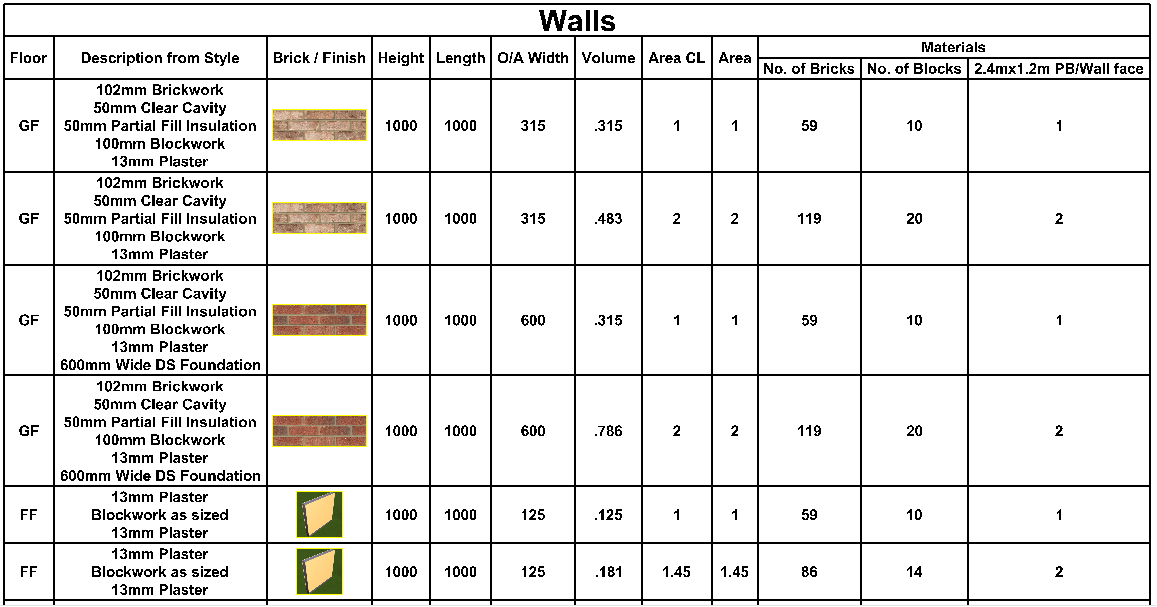
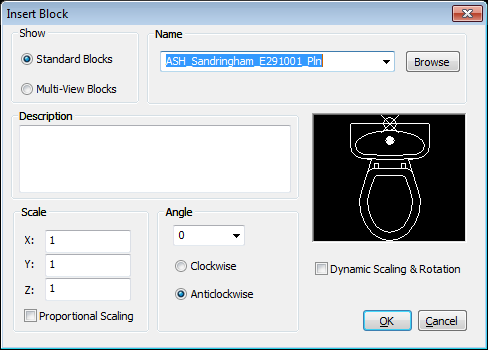
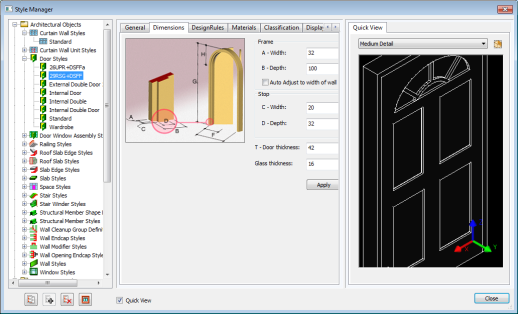
Multiple Custom Blocks can now be added to your Model, Plan and Elevation representation for your Doors and Windows; again, these benefit enormously from the live previews that allow you to place the Blocks exactly first time, eliminating the iterative guess work, and allowing you to present your AEC drawings with all the style and finesse of your 2D plans and elevations. In the same way, the AEC Object Viewer… available from the Right-Click CSM provides the perfect way to view your objects in isolation in any detail, from any direction, and in any Render Mode, all without having to set affect the Scope flags for your drawing. And if your Caddie licence is enabled for Caddie VIO, the photo-realistic rending app, then you can also render your object to see how it will look in your final presentation. Quick 3D Rotate is a superb addition for those who get all fingers and thumbs attempting to work out which axis you want to rotate your Objects around, and whether you want a positive or negative rotation. Simply Select the Object or Objects in question, Right-Click to the CSM then choose Quick 3D Rotate, available under3D Modify. Quick 3D Rotate allows you to select the angle you want, pick your point about which to rotate, and then toggle through all the available possibilities, dead easy; and if this wasn’t great enough, type the letter ‘M’, hit return, and you can also Move your newly rotated Objects into the desired location all with the same tool. AEC Walls. With the inexorable move towards designing greener buildings, the need to respond quickly to changing legislation and construction methods has till now made it difficult to keep Wall Style libraries up-to-date. However, the new Create Wall Style from Lines command changes all of that. Now creating AEC Wall Styles is as easy as picking sweets from a jar, you can even load an existing 2D drawing and create a fully hatched AEC Wall directly from it in seconds. And don’t forget that by using AEC Wall Styles rather than dumb Lines and Hatch, adding Doors, Windows and Openings becomes easier too, no more trimming to do, no more deleting segments or modifying Hatch, just point and click and Caddie AEC takes care of the rest. Drawing AEC Walls just got faster too with the Make Walls tool from the AEC section on the CSM. Turn a Polyline building outline into a fully detailed AEC Wall of your choice in seconds without having to trace around every point on the outline, you even benefit from the full colour previews that have been added to the Wall Style dialogue, to make choosing the right wall simpler too. Creating and modifying Wall Endcaps has also become easier with Caddie 19, with the ability to extract the Polylines from any chosen AEC Wall, drop the components in location, make any changes then simply hit End Edit Endcap from the top AEC|Walls Menu to see the revisions you made take effect throughout your drawing. Quick Plan Modifier from the CSM is another new addition to the armoury, making the addition of piers and projections to AEC Walls the matter of seconds, yes, sure you can still use the full on Wall Plan modifier tool when you want to make additions part way up a wall and so on, but if all you want to do is click around the points to add the outline to your wall, this will do it nicely, quick, simple, and no fuss. AEC Windows, Doors and DWAs can now be moved both Within Walls and Along their length too to make setting the depth of reveals and aligning on plan simple. Simply select the Window, Door or DWA and choose the alignment tool straight off the CSM. Working hand-in-hand with the alignment tools, new Anchor Position Tab on the Window and DWA dialogues makes setting your preferred insertion point simple and reproducible, no need to place and move individually, each one is inserted in the exact position you want it, you can even use the Get Parameters button to set the position from one you have drawn previously too. Adding Windows, Doors and DWAs that span walls is also much, much easier now with the Auto Create Opening tool under the top AEC Menu., making adding glazing to stairwells, and dormer Windows that cross the eaves line a simple point and click operation, obviating the need to gather intelligence on the height and size of the opening prior to making the Opening required in the Wall. AEC Schedules now feature the ability to include images within them, great when specifying specific components such as lighting, or brick types, surface finishes and so on, and all automatically included from the Objects you draw. Calculations can be included in Tables now too, allowing you to take the properties of the Objects in your drawing and produce from them the quantities of materials needed to build your designs, quantities that automatically update when you make alterations (just set the ‘Update Automatically’ flag from Object Properties to get live updates). So now you can draw out your plans and get itemised schedules for Doors, Windows, Walls, Roof tiles, Battens, and so on, all with just a few 3D Views, Orbit and Render Modes
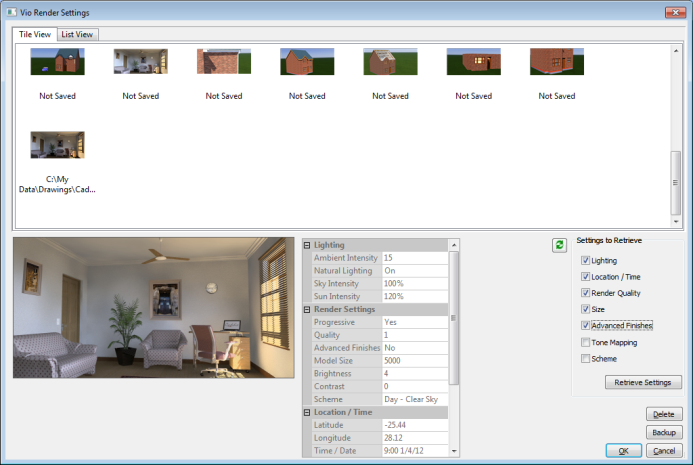
Caddie VIO Photo-realistic Rendering Sun Study creation is another area that has benefited with the advent of Caddie 19, now you can choose the times you wish to include in the study, rather than the set times previously available. This small but important change means that you can be much more specific about the period under study, enabling thorny Planning issues, for example, to be tackled much more easily.
Caddie 19 Download Links
Find out more about Caddie and the Caddie UK User Group For more information on Caddie or the Caddie UK User Group and any of the subjects raised in this update Follow us on:
Note: |
||||||||||
|
|


 for producing architectural drawings, then with the introduction of this latest series of enhancements, this is an ideal time to start reaping the rewards.
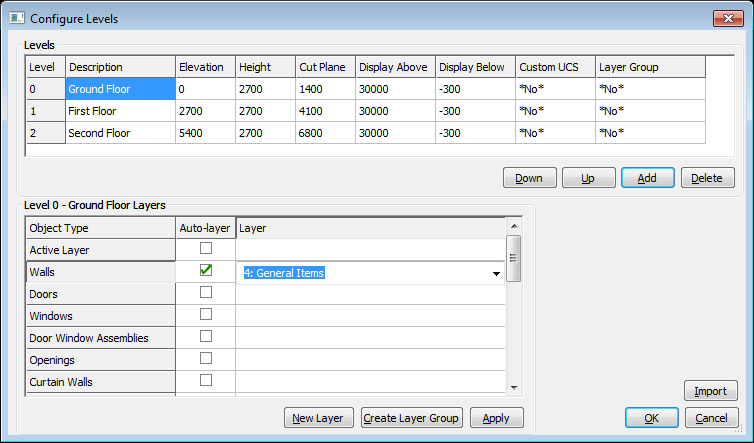
 Dynamic Previews and Object Viewer.