Midgley Design Consultants revive past glories for Grade 1 listed Moated Manor House
Colin Midgley, of Midgley Design Consultants discusses how a serendipitous CDP visit to the i360 Tower site in Brighton helped solve a structural conundrum on an addition to a West Sussex Grade 1 listed Moated Manor House.
At the time of the height of the Raj, there was a continuous Veranda across the full width of Newtimber Place, and on examining the 'before' photograph (below) one can see the ‘scar’ on the wall where the original Verandah sloped down over the left hand window. The Verandah was supported by purpose built brick columns, with one lone column still visible above the bush in the centre of this shot – supporting nothing but fresh air!

In the 1960’s, two of the other columns had been re-located in order to create a rather ugly part-flat-roofed ‘gazebo’ with central Velux-style window.
The brief was to remove the lean-to and come up with a design for a free-standing Gazebo, based on the position of the outer 4 columns. The clients and owners of Newtimber place host Wedding parties and guests want their photos taken with the back-drop of the glorious house. (Part of the brief was to repair and restore the bay windows – which was done prior to re-building the Gazebo). But the design for a new roof on the Gazebo was best designed with Caddie – providing both the accuracy, and the freedom to design that I needed in order to be able to achieve the result that the job demanded.
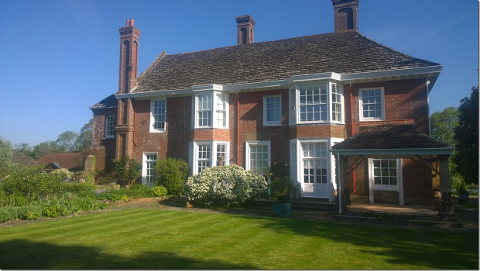
The bays have now been repaired and restored, as can be seen in the image above, and the Gazebo re-roofed (based on my Caddie drawing). However, the client was concerned about the overall stability of the old brick columns, querying whether exposure to high winds might risk the whole (and very heavy) roof toppling over in a storm, asking,
'What can we do? We need something imaginative and stylish to reinforce the corners of the structure ... sort of “Brackets” but this is a National Monument... well at least it’s part of an important Grade I listed, Moated Manor House ... we need something very special !!'
the builder installed temporary casing and struts and put in the call to the office. So, as a precautionary measure, the builder installed temporary casing and struts and the search for a suitable design solution began.
The Search for a Solution Begins

Inspiration came from the brackets on the reconstructed kiosks at the Grade I listed reconstructed West Pier site fronting the i360 Tower site in Brighton – visited during a Continuing Professional Development visit organised by the Chartered Institute of Building's South East Committee.
Inspiration came when visiting the i360 Tower site in Brighton during a Continuing Professional Development visit organised by the Chartered Institute of Building's South East Committee. However, the inspiration came not from the Tower itself, but rather, from the brackets on the reconstructed kiosks at the Grade I listed reconstructed West Pier site which fronts the site.
While others were looking at the ‘space ship’ capsule, I was looking at some cast aluminium brackets, themselves replicas of previous cast iron versions, which had supported the overhanging roof of the original kiosks – shops selling Candy Floss, Brighton Rock etc. The Kiosks were undergoing reconstruction, and the now re-cast brackets were waiting to be installed.
'Perfect', I thought, exactly what the Newtimber Place Gazebo, required, but now the problem arose of how to reproduce the duly inspired brackets, a problem made all the more difficult since British Airways were discouraging the taking of photographs of the site. Fortunately, the well timed receiving of a telephone call, allied to an accidental simultaneous pressing of the 'Snapshot' button, delivered an image from which the design could evolve.
The Serendipitous CPD Visit


Enlarging a section of my photograph, I had exactly what I needed to form the basis of the design for the brackets!!

Back at the Office, I inserted the image into a new Caddie drawing, then traced over it using a combination of Curves and Polylines to produce my 'Bracket Design for Newtimber Place'!!
Design and Fabrication
The bracket designs were then printed out at a scale of 1:1, pasted to foam board and cardboard, then cut out to provide full size 3D models of each bracket. Since each column was subtly different form the next, a solution was required to take account of the column irregularities to provide a more generic solution, something that was achieved by adding a box section to the back of each bracket.

The steelwork was laser-cut from 5mm steel plate, all based on the .DWG format drawing produced with my Caddie CAD system which was forwarded to the steel fabricators. In order to ensure that the laser cutting machine could accurately reproduce my design in the finished cut sheet, each corner in the scroll pattern was required to have a minimum radius of 3mm. The fine tuning of the design to meet this exacting standard was fairly labour intensive, however, it was a job made all the simpler by being able to draw on Caddie’s ‘Quick Select’ function to identify all the curves with a radius less than required. The finished result was an accurate and aesthetically please bracket that I don’t believe I could have produced without the aid of my Caddie system.

In addition to the main frame, there were the ‘box’ sections (as can be seen in the left of the image below, and in the background to). Since everything was to be galvanised, then white powder-coated, the box sections had to be fabricated separately.

The outer frame is forged steel done by Malcolm Johnson the local blacksmith – a specialist in historic ironwork and Listed restoration-work. The fretted laser-cut plate is riveted into place with dome-headed rivets, fixed to ‘tabs’ welded into the corners to accept the fretted plate.
Malcolm worked on his bench with ‘flat’ templates printed on my wide format printer at full size, and spray-mounted onto foam board for rigidity. The need for accuracy required Malcolm to place red hot steel onto the full sized templates to forge the curves accurately, meaning the templates became somewhat scorched by the time he was done – much to Malcolm’s amusement!
Malcolm went on to explain that any air trapped in the steelwork could cause an explosion due to the high temperatures involved in the galvanising process itself. Therefore, anything tubular (or hollow ‘box’ section) needs to have holes drilled into it at strategic positions in order to allow any air to escape. Since there was no way of welding the flat steel rectangular frame sections to the hollow ‘box’ sections without the risk of creating an air pocket – and thus a galvanising explosion, each bracket needed to be made up of 3 elements, the lattice framed section, and two box sections.
On return, each piece needed to be ‘fettled’ a process that involved filing off any drips or spots and imperfections in the surface of the pieces left from the galvanising process, before they could be sent for powder coating. Due to the intricate nature of the design the ‘fettling’ work had to be done by hand using needle files, a laborious job that kept Malcolm at his work bench for several days of painstaking work.
Each bracket was held in pace while the brick columns were marked, then drilled and resin anchor threaded bar glued into the columns to bolt the brackets in place.
Fixing the Brackets


The finished Gazebo


The most wonderful result... like butterflies adorning the finished Gazebo - all ready for the next Wedding Photos (once I’ve got the guys to tidy up the rainwater downpipe that is, which does look a bit ugly!!)
And a result that simply wouldn’t have been possible without Caddie (plus a bit of plagiarism and hard thinking!).
Midgley Design Consultants
Colin Midgley, the practice principal at Midgley Design Consultants has worked in the UK design and construction industry for 35 years specialising in domestic and commercial planning and design.
