.png)
One important option in the sheet setup and model space is the 'Plot Style’ to be used when printing. It is a good idea to setup the various plot styles you will need in your environment BEFORE creating the required sheets for printing. This will typically be a one-off requirement. To configure the various plot styles, select the 'Configure Plot Styles’ from the file menu.
Caddie displays the dialogue illustrated below.
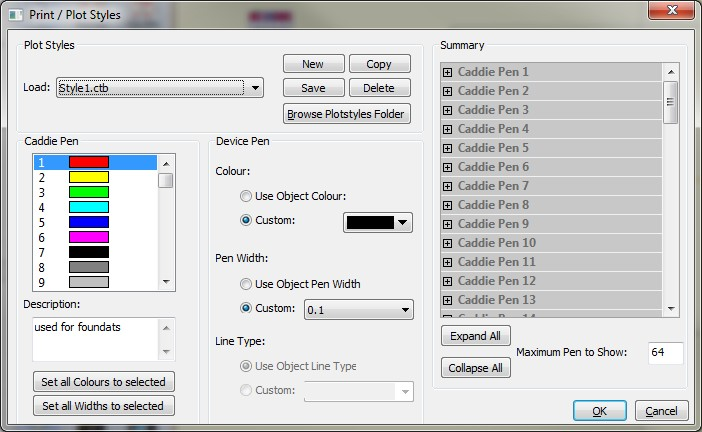
The pen settings shown in this dialogue belong to the style that is shown in the load style window which is always the alpha-numerical first in the list when the dialogue is opened. This may not be the one that you require so check before altering any settings.
Create a new style. Every pen is set to object thickness and object colour. Create a new customised plot style. Caddie prompts you to enter a name for the new plot style
Copy an existing plot style. This is useful in environments where you may have more than one printer available to you for printing. By creating your own plot styles, you can then easily select the plot style whenever you are about to print a sheet. Using copy to create a new style can be more convenient than using the new, as there maybe many pen, such as fill pens, that you don't want to change, just the thicknesses of a small number of pens.
Load a pre-defined plot style to be used to print sheets.
Save any changes made to the currently selected plot style. Clicking on 'Save’ will save any changes you have made and allow you to continue with any other changes you wish to make. If you make any change that were unintentional click cancel to close the dialogue window without saving
Deletes the currently loaded plotstyle from the computer. There is no warning so ensure you have a back-up of all plotstyles - see Browse Plotstyle Folder (below).
Selecting this opens the plotstyle folder in a standard windows explorer window. Plotsyles are *.plt files. Using standard Windows selection methods these can be selected, copied and deleted etc. but is useful to use this feature for copying for achieve, renaming or placing plotstyles from other users etc.
This is a listing of all available pens in Caddie. To configure a pen, simply scroll through the list of pens and click on the one you want to configure.
Enter a brief description of the usage of the selected pen.
Colour Width Line Type Use Object Colour -Print objects in the selected pen’s screen colour setting. Custom -Select a custom colour to use when printing objects drawn in the selected pen. Use Object Pen Width -Print objects using the selected pen’s screen width setting. Custom - Set the desired pen width when printing objects drawn using this pen. Use Object Line Type -Print objects using the selected pen’s screen line type setting. Custom -Set the desired line type when printing objects drawn using this pen.
The Pen Listing summary contains a listing of all pens and the current screen colour, print colour and width settings. You can expand or collapse this listing using the 'Expand All’ and 'Collapse All’ buttons.
This is useful to speed up the refreshing of the list every time you make changes to any settings as the entire list is refreshed each time you make changes. Set this value to 10 so that you reduce the time it takes to refresh the list. This way only 10 pens need to be refreshed. If you use more than 10 pens, then you can always change this value.
|
Make sure that all pens that you are using for printing have a positive width set. Some pens in the default styles that ship with Caddie have a zero value for the width. This will mean that pens drawn using these values will not print or be visible in the print preview window. If this happens to you, the likelihood is that the non-visible pens have a zero width. Re-configure the plot styles to correct the problem. |
