Please read the following guide before installing Caddie.
Using the standard options, the installation of Caddie should be straight forward.
The installation process will vary depending on the license you have. There are three types of license:
Softlock License
The period of the license can be purchased. This is issued for a short term rental of Caddie or a Student license. At the end of the time period the license will revert to Demo
If no time has been purchased the license is Evaluation and lasts for 14 days. After 14 days the license reverts to DEMO. It can be converted to any other license at any time.
The licence for a softlock is not transferable between computers.
Hardware License (Dongle / HASP)
Full Caddie, needs a Hardware key which also needs an additional driver to be installed (see below)
Network License (Network Dongle / HASP)
Needs a special hardware key and additional License Manager software to be installed on the Network Dongle Server. This is covered at the end of this document.
Evaluation -
The Evaluation license lasts for 14 days.
Caddie will automatically be in Evaluation when Caddie
runs for the first time or is the selected license.
Demo is a full installation without the requirement of any hardware or software license. The only limitation is the ability to save or copy drawings or drawing elements. Caddie will run in 'DEMO' mode when:
The Softlock 14 day evaluation period has finished
A hardware dongle is not present at the time of Caddie loading or it has been removed with Caddie
running
The hardware dongle has not been authorised
There are no more Network licenses available
Incorrect HASP driver has been installed
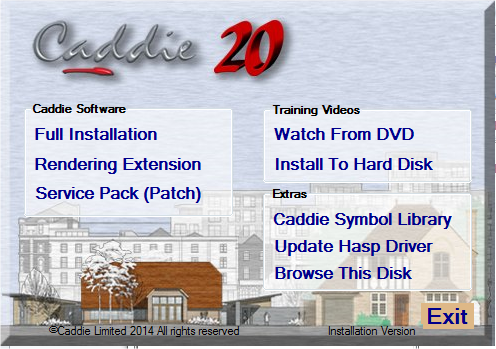
To install the software insert the DVD into your DVD player and as long as your operating system is set up to recognise the disk installer, it will Auto Run.
If it doesn't run, use Windows Explorer to find the file Setupsplash.exe on the root of the DVD and run it.
Installing Caddie
From the dialogue, select Full Installation and follow the installation prompts and do a Typical installation.
Installing Caddie Vio Rendering Extension
This is normally
installed at the same time as Caddie. If it need to be installed separately
from the dialogue,
select Rendering Extension to install Caddie Vio photo-realistic rendering
integrated into Caddie Professional.
Installing Caddie 18 Symbol Library
You will normally be asked if you want to install the symbol library. If it needs to be installed separately, this can be done by selecting Caddie Symbol Library from the menu.
Installing the Caddie Training Videos
From the dialogue, select Install To Hard Disk to install the Caddie training videos.
Note these training videos are on the Installation
disk and not the What's new video disk. The Video disk is designed to
play from a standard video recorder or a computer with the correct programme
and drivers.
Additional drivers for a computer can be found by “Browsing This Disk”
from the installation menu and running
the file in the “VLC” folder.
Plug Dongle In
(Skip this step if you have an Evaluation or a Time limited license.)
If you have been
provided with a Dongle Key (HASP) then now is the time to plug it in. Insert
the dongle into a
convenient USB socket and wait for it to light.
If this is a Caddie 18 reinstall, this step maybe ignored so go to “What to do if Caddie runs in Demo Mode”
When Caddie runs for the first time there are a number of settings that need to be finalised so you will see the following dialogue.
Select your region
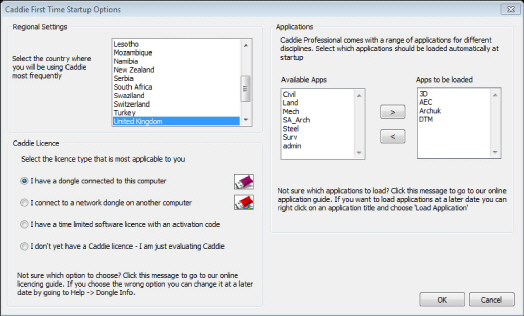
Select the License type.
Choose one of the following depending which licence you have (the introduction explained the various licence types).
I have a Dongle Key (HASP) choose
'I have a dongle connected to this computer'
I have a network dongle choose
'I connect to a network dongle on another computer'
(see separate instructions for installing a network dongle).
I have a time limited license (softlock), you will not have a dongle and you will have an activation code choose
'I have a time limited software license with an activation code'
I am evaluating a version of Caddie for the first time
'I don't have a Caddie License I am evaluating Caddie'
If the Evaluation has expired Caddie will run in Demo Mode.
Select the applications you want to load.0
A suggested selection is either ArchUK or SA_Arch and 3D.
(You can right-click on the Caddie application button when in Caddie to load and unload
applications at any time.)
Once set select OK.
Caddie will run in Demo Mode if any of the following occurs
Your Time Lock period has elapsed
If you have an Education version or a load of caddie there will be a time period associated with you licence. Once this has expired caddie will revert to the Demo mode. If you need to extend this period Please contact Caddie. Note the softlock licence is on a per-machine basis and cannot be transferred. Contact Caddie for further information.
Your Evaluation period has elapsed
The standard evaluation period is 14 days
You haven't inserted your HASP key (dongle) if you have one.
If you have a USB dongle. This needs to be inserted and lit in order for Caddie to recognise it and before caddie is run. If it is not recognised this can be because the drivers have not been installed or are to wrong ones for you operation system. If the dongle is lit then all you may need to do is fllow the instructions below, to obtain the security file.
Your need to obtain a security file
Your dongle may be lit but the security file is the incorrect one for your licence. If you are a maintained user then follow the step s below
Go to the Help Menu and select Dongle Info and you will see the dialogue below.
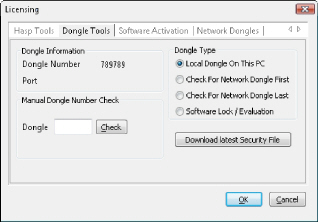
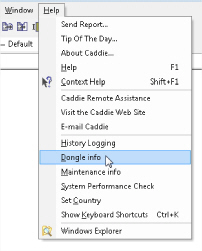
If you have a dongle and the software has been installed correctly, you should see the number of your dongle mentioned.
You are running in either Evaluation or Demo mode. If this is required then there is nothing else to do
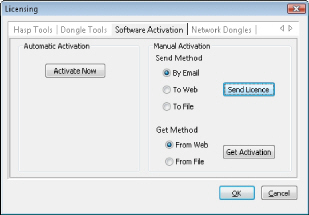
If you have a Softlock then you will need to activate your license. The easiest way is to connect your
computer to the internet and select the ACTIVATE NOW button. Manual activating is also possible by selecting your required options.

If you have a dongle select the Download Latest Security File button. Once done you will get the following message.
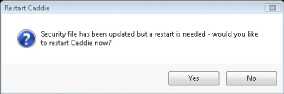
Select 'YES' and Caddie will restart in the mode you are licensed for.
If you have a firewall
or your Windows security blocks the replacement of the file you will have
to first remove
the existing one manually. To do this go to MENU
| | HELP | WINDOWS EXPLORER. This should
open
Windows Explorer at the Caddie folder. Find a file called MSDBUTILS.DLL and
delete it. Now try the Download
Latest Security File“ again.
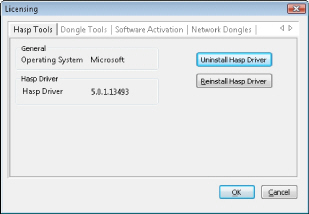
If you have a Dongle and it is plugged in and lit, run the Uninstall Hasp Driver followed by a Reinstall Hasp Driver from the Hasp Tools Tab. Note the driver installed should be as shown or higher.
See the Caddie Web Site (FAQ) for further information regarding Windows Permissions.
If this still doesn't produce a number then please contact Caddie.
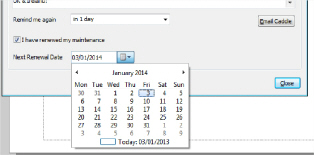
Caddie has an in built notification of the maintenance date for the dongle currently plugged in. This date is normally set from the online database and in some cases may take some time to update. However if you wish you manually update the date for the dongle, go to HELP > MAINTENANCE INFO.
Tick the box “I have renewed my maintenance” and set to date to the correct date of maintenance expiry. If this is unknown, contact Advanced Computer Solutions for the date on record.
Note: If this is the first year of using then the date will usually be the initial invoice date. If you have already updated your Caddie maintenance an email would have been sent with the new expiry date. In some cases the invoice for any updates may include the expiry date.